A lightweight extension which lets you disable all links on a webpage.
Get the extension
Usage
To toggle between disabling and enabling all links, simply click the extension icon (located in the upper right corner of the browser) or use the keyboard shortcut Alt + Shift + D.
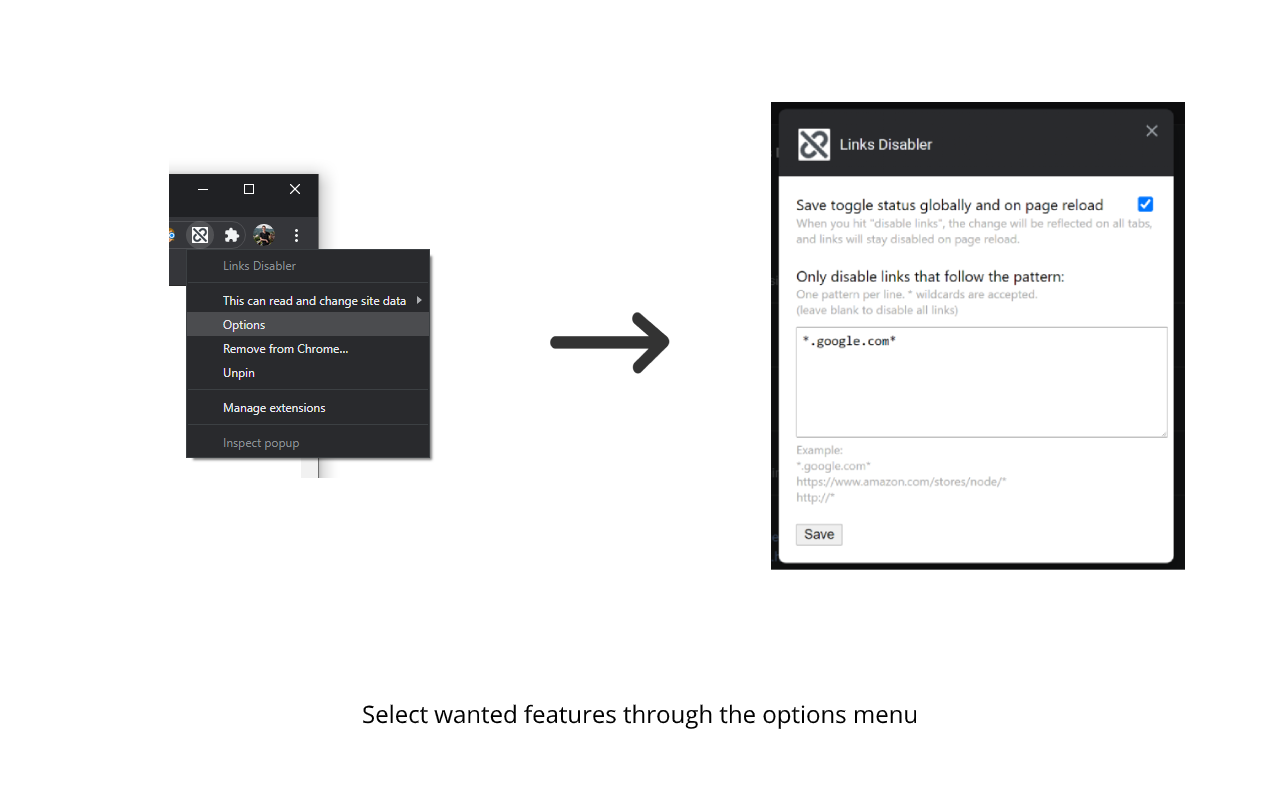
Features
The extension curretly comes with two main features, which can be activated through the extension’s options page (see below for more details).
Save toggle status globally and on page reload
If this option is checked, when you hit “disable links” the change will be reflected on all tabs, and links will stay disabled even after page reload.
Only disable links that follow a pattern
If this option is enabled, when you hit “disable links” only links in the disable list will be disabled. All other links will stay enabled.
This option is automatically enabled if the disable list is not empty.
The disable list can be configured with a pattern per line, and accepts wildcards with the * sign.
A little helper for automating some of the more tedious tasks of automation with the DITA Open Toolkit
Note: This README is compiled (using dita-ot-helper) from the DITA sources in the /samples/readme folder. Direct changes to the README.md will get overwritten.
Abstract
At its core, the goal of this project is to create an abstraction layer for the DITA Open Toolkit compilation process that “fixes” a few pain-points. These “fixed” (to a degree) aspects are:
An easy-to-use project file system allowing easy automation
Installing DITA-OT in autonomous environments (such as Continuous Integration)
DITA OT Plugin dependencies (local and remote) for specific compilations
Local plugin reinstallation from a development directory. A documentation repository contains a customized PDF plugin in a folder. dita-ot-helper automatically (re-) installs this plugin before compiling.
This automatically compiles using the local org.mypdf.plugin folder’s plugin. It also uses the companyPDFtranstype this plugin might defines.
With this config file, everything involved in compiling this (without the plugin being pre-installed etc.) is running
$ dita-ot-helper config.json
from your command line. It’s as easy as that.
Documentation
Dependencies
NodeJS, v10+
on Windows: .NET Framework 4.5+ and Powershell 3 (preinstalled on WIndows 8+)
Optional: dita from the DITA Open Toolkit, version 3.5+ (can also be installed temporarily using the helper!)
Install dita-ot-helper
Install the dita-ot-helper using npm
Run
$ npm install -g dita-ot-helper
in your command line
dita-ot-helper is now installed on your computer.
Compile DITA documents
Compiling DITA documents using the dita-ot-helper
Create a config.json for your project.
The config.json defines how your document gets compiled.
Note: You can find a few examples for configurations in the repositories samples directory. All options of the config file are documented below in the JSON Config File section.
In this case, we want to compile a document.ditamap file using the markdown transtype. Our config.json (next to our DITA map file) could therefore look like this:
Note: By default, the DITA command output is hidden. To enable it, use the -v or –verbose argument in your command:
$ dita-ot-helper -v config.json
Tip:Compiling documents without having DITA-OT installed on your system
It’s possible to compile documents using the helper without having DITA-OT installed. In this case, just add the -i or –install argument to your command. You can also specify a specific version of DITA-OT. This then installs the specified version of DITA-OT in a temporary location (this gets deleted after the command is run).
This is especially useful for autonomous environments such as Continuous Integration as it allows you to compile DITA documents with one command without a lot of setup.
After a short while, the tool outputs > Compilation successful.. The document is now compiled.
If compilation isn’t successful, re-run the command using the –verbose option and follow the instructions in the error message shown there.
Your document is now compiled and is in the out folder next to your config.json.
Compile multiple documents
Compile multiple documents with one command using glob patterns
The CLI makes use of the node glob library. For possible glob patterns and other information, please refer to their documentation. Basic knowledge of glob patterns is required to fully understand this task.
When you have multiple configurations, e.g., for multiple maps and/or multiple deliverables per map, it is possible to compile all of them using just one command.
To provide an example, we’ll assume you have the following directory structure (samples/sample-3 provides a similar example):
./ (current working directory)
    end-user-manual-pdf.json (input => ./end-user-manual.ditamap)
    end-user-manual-html.json (input => ./end-user-manual.ditamap)
    end-user-manual.ditamap (A DITA map)
    [...] (DITA documents)
Tip: To avoid confusion, we suggest to specify individual output directories in your configuration files for each configuration. This way, each configuration will have exactly one corresponding output directory.
Run the dita-ot-helper command using a glob pattern to match your configuration files
The same patterns as with Compile DITA documents apply here. The only difference is using a glob pattern instead of the file name of a config file.
In our example from above, we need to run
$ dita-ot-helper end-user-manual-*.json
dita-ot-helper will process (i.e., compile) all the JSON files matching the patterns.
Aborted due to non-existent or non-readable config file
4
Aborted due to invalid config file
5
Something went wrong while installing DITA-OT using the -i flag
JSON Config File
The project configuration file for the dita-ot-helper tool.
Using a JSON config file (which is required for using dita-ot-helper), you can define:
required plugins
the project input file
the transtype that should get used
The tool will then automatically install the plugins and compile the document according to those specifications.
Below, you can find all the options you can put into your configuration file.
Note: Your configuration file can have any possible filename. However, we recommend using dita-ot-helper.json or config.json for clarity.
JSON object properties
JSON field
Type
Description
input
string
Relative (to the config.json) or absolute path to your input file. Gets passed to the -i argument of the dita command.
output
string
Relative (to the config.json) or absolute path of the output directory of the compiled file. Gets passed to the -o argument of the dita command.
propertyfile
string
Relative (to the config.json) or absolute path of a .properties file. Gets passed to the --propertyfile argument of the dita command.
resource
string
Relative (to the config.json) or absolute path to a resource file, e.g., a map containing key definitions. Gets passed to the -r argument of the dita command.
plugins
string[]
An array of plugin paths. dita-ot-helper will ensure these plugins are installed (or, if not, try to (re-) install them) before compilation. This accepts a few different types of plugin specifiers documented in the table below.
transtype
string
The documents transtype. Gets passed to the -f argument of the dita command.
Plugin specifications
Type
Behavior
Example
Plugin Name
Installs (if non-existent) a plugin by its name from the registry. Similar to dita install
org.lwdita
Plugin .zip URL
Installs the plugin from the plugin ZIP file URL (via the internet). Similar to dita install
https://example.com/dita-ot-pdf-plugin.zip
Plugin .zip path
Installs the plugin from the plugin ZIP file path. Similar to dita install
./my-plugin.zip, /home/example/plugin.zip
Plugin directory path
(Re-) Installs a plugin from its source directory. This is especially useful if you have a customized PDF plugin inside your documentation repository as you can simply specify this plugin and let dita-ot-helper do the work of zipping, installing and using it for you. Similar to zipping the specified directory and running dita install on the zipped file.
A simple way of creating beautiful movies from xarray objects.
With ever-increasing detail, modern scientific observations and model results
lend themselves to visualization in the form of movies.
Not only is a beautiful movie a fantastic way to wake up the crowd on a Friday
afternoon of a weeklong conference, but it can also speed up the discovery
process, since our eyes are amazing image processing devices.
This module aims to facilitate movie rendering from data objects based on
xarray objects.
Xarray already provides a way
to create quick and beautiful static images from your data using Matplotlib.
Various packages
provide facilities for animating Matplotlib figures.
But it can become tedious to customize plots, particularly when map projections are used.
The main aims of this module are:
Enable quick but high-quality movie frame creation from existing xarray
objects with preset plot functions — create a movie with only 2 lines of code.
Provide high quality, customizable presets to create stunning visualizations with minimal setup.
Convert your static plot workflow to a movie with only a few lines of code,
while maintaining all the flexibility of xarray
and Matplotlib.
Optionally, use Dask for parallelized frame rendering.
Saving a .gif is as easy as changing the filename:
mov.save('movie.gif')
That is it! Now pat yourself on the shoulder and enjoy your masterpiece.
The GIF is created by first rendering a movie and then converting it to a GIF.
If you want to keep both outputs you can simply do mov.save('movie.gif', remove_movie=False)
Bash script to patch XFCE Thunar to be able to use custom actions everywhere.
By default, most actions are disabled in network folders, Desktop, etc.
Even the default action Open terminal here is disabled in network shares.
XAP works only on debian-based distros like Debian, Ubuntu and Mint with XFCE4.
If you are interested on patching a non debian-based system, open a new issue and I may try to help.
xap.sh will install apt-get packages and dependencies without confirmation, it will only ask for confirmation to install the modified thunar package.
xap.sh will ask for confirmation before deleting the work folder or installing the patched thunar.
It is possible to avoid the confirmations by using the execution parameters -f, -k, -d.
Disclaimer
XAP should be safe and has been tested on Ubuntu16+XFCE4, Xubuntu16, Mint17.3 (32bit & 64bit), however… Thunar is part of the XFCE system, I am not reponsible for any harm caused by this script.
USE AT YOUR OWN RISK!
How To
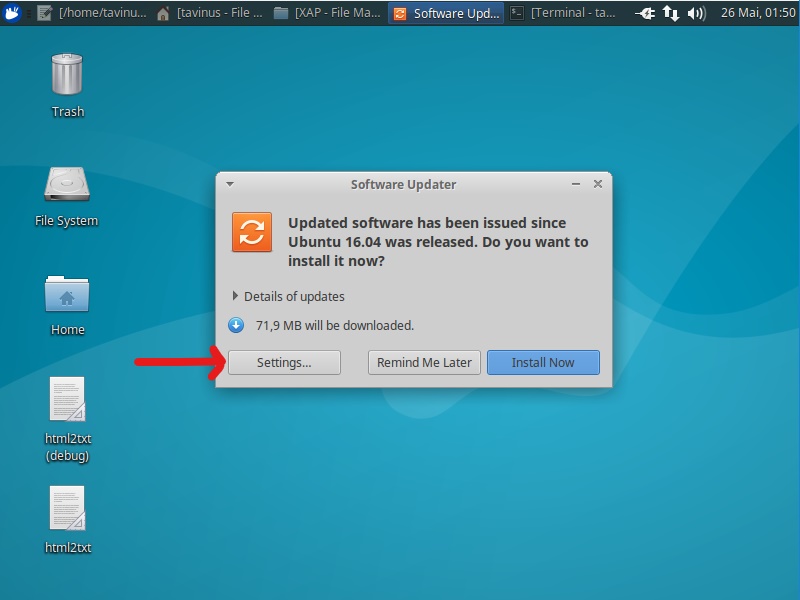
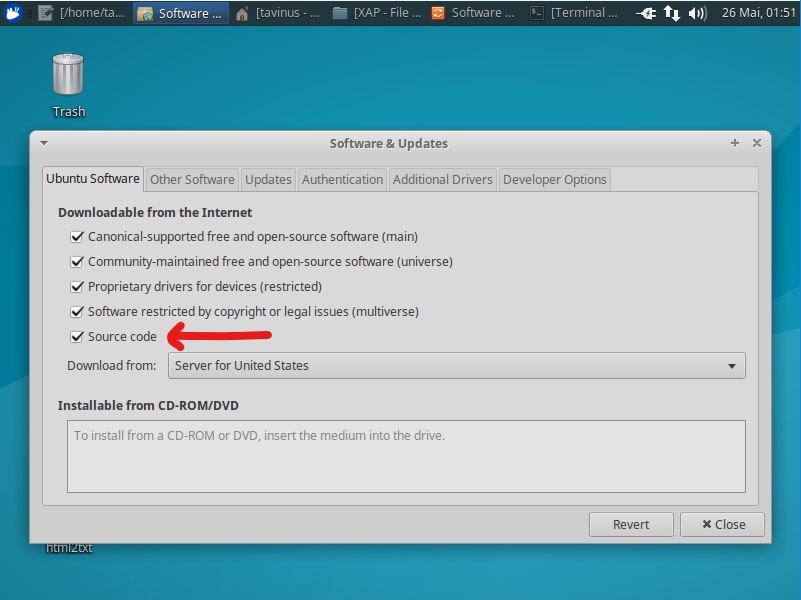
Enable source-code repository
This script uses apt-get build-dep(s) to prepare the environment.
In order to use this, you will need to have source-code repositories enabled.
The easiest way is through Software Updater → Settings → Ubuntu Software Tab → Source code.
Screenshots for Xubuntu16 available at the end of this page.
Download
NOTE:If you use git clone or the zip, xap.sh will detect the local patch file and use it, instead of downloading it from the internet. This will also remove the dependency on curl or wget and disable the --mirror parameter.
Clone using git
git clone https://github.com/tavinus/xap.sh.git
cd xap.sh
./xap.sh --help
$ ./xap.sh

XAP - XFCE Actions Patcher v0.0.1

Checking for sudo executable and privileges, enter your password if needed.
[sudo] password for tavinus:
Done | Updating package lists
Done | Installing thunar, thunar-data and devscripts
Done | Installing build dependencies for thunar
Done | Preparing work dir: /home/tavinus/xap_patch_temp
Done | Getting thunar source
Done | Downloading Patch
Done | Testing patch with --dry-run
Done | Applying patch
Done | Building deb packages with dpkg-buildpackage
Done | Locating libthunarx deb package

Proceed with package install? (Y/y to install) y
Done | Installing: libthunarx-2-0_1.6.11-0ubuntu0.16.04.1_i386.deb

Success! Please reboot to apply the changes in thunar!

The work directory with sources and deb packages can be removed now.
Dir: /home/tavinus/xap_patch_temp

Do You want to delete the dir? (Y/y to delete) n
Kept working dir!

Ciao
No prompts, delete temp folder if already exists, keep temp files at the end
This is also using the github mirror for the patch -m
$ ./xap.sh -m -f -k -d

XAP - XFCE Actions Patcher v0.0.1

Work directory already exists! We need a clean dir to continue.
Dir: /home/tavinus/xap_patch_temp
Working dir removed successfully: /home/tavinus/xap_patch_temp
Checking for sudo executable and privileges, enter your password if needed.
Done | Updating package lists
Done | Installing thunar thunar-data devscripts, we need these up-to-date
Done | Installing build dependencies for thunar
Done | Preparing work dir: /home/tavinus/xap_patch_temp
Done | Getting thunar source
Done | Downloading Patch
Done | Testing patch with --dry-run
Done | Applying patch
Done | Building deb packages with dpkg-buildpackage
Done | Locating libthunarx deb package
Done | Installing: libthunarx-2-0_1.6.11-0ubuntu0.16.04.1_i386.deb

Success! Please reboot to apply the changes in thunar!

Keeping work dir: /home/tavinus/xap_patch_temp
Ciao
Following log file during execution
Use this command on another terminal window You need to run this AFTER starting xap.sh, obviously
tail -f /tmp/xap_run.log
Options
$ ./xap.sh --help

XAP - XFCE Actions Patcher v0.0.1

Usage: xap.sh [-f -d -k]

Options:
  -V, --version           Show program name and version and exits
  -h, --help              Show this help screen and exits
  -m, --mirror            Use my github mirror for the patch, instead of
                          the original xfce bugzilla link.
      --debug             Debug mode, prints to screen instead of logfile.
                          It is usually better to check the logfile:
                          Use: tail -f /tmp/xap_run.log # in another terminal
  -f, --force             Do not ask to confirm system install
  -d, --delete            Do not ask to delete workfolder
                          1. If it already exists when XAP starts
                          2. When XAP finishes execution with success
  -k, --keep              Do not ask to delete work folder at the end
                          Keeps files when XAP finishes with success

Work Folder:
 Location: /home/tavinus/xap_patch_temp
 Use --delete and --keep together to delete at the start of execution
 (if exists) and keep at the end without prompting anything.

Patch File:
 The local patch file will be always used if available, download is disabled.
 If there is no local file, wget or curl will be used to download it.
 Use the "-m" parameter to download the patch from the github mirror.

Apt-get Sources:
 Please make sure you enable source-code repositories in your
 apt-sources. Easiest way is with the Updater GUI.

Examples:
  ./xap.sh             # will ask for confirmations
  ./xap.sh -m          # using github mirror
  ./xap.sh -f          # will install without asking
  ./xap.sh -m -f -k -d # will not ask anything and keep temp files
  ./xap.sh -m -f -d    # will not ask anything and delete temp files
The Coordinate Reference Systems Library was developed at the National Geospatial-Intelligence Agency (NGA) in collaboration with BIT Systems. The government has “unlimited rights” and is releasing this software to increase the impact of government investments by providing developers with the opportunity to take things in new directions. The software use, modification, and distribution rights are stipulated within the MIT license.
Pull Requests
If you’d like to contribute to this project, please make a pull request. We’ll review the pull request and discuss the changes. All pull request contributions to this project will be released under the MIT license.
Software source code previously released under an open source license and then modified by NGA staff is considered a “joint work” (see 17 USC § 101); it is partially copyrighted, partially public domain, and as a whole is protected by the copyrights of the non-government authors and must be released according to the terms of the original open source license.
About
Coordinate Reference Systems is an iOS library implementation of OGC’s ‘Geographic information — Well-known text representation of coordinate reference systems’ (18-010r7) specification.
For projection conversions between coordinates, see Projections.
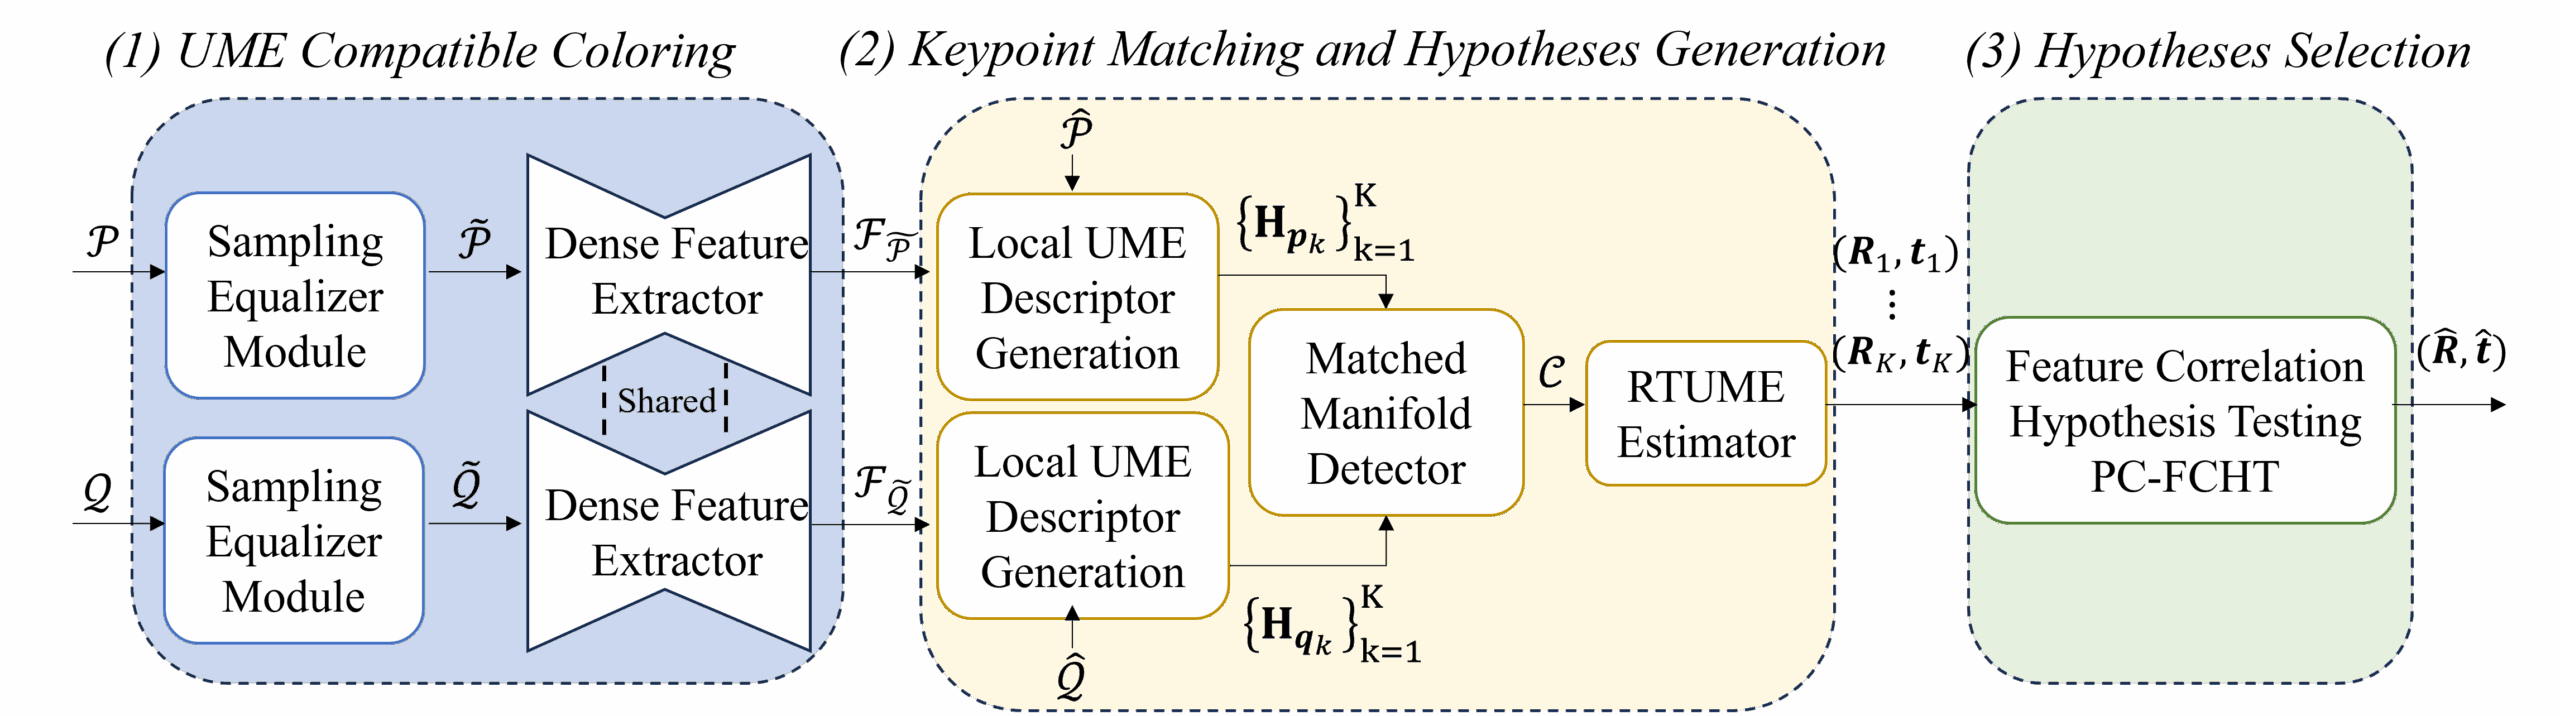
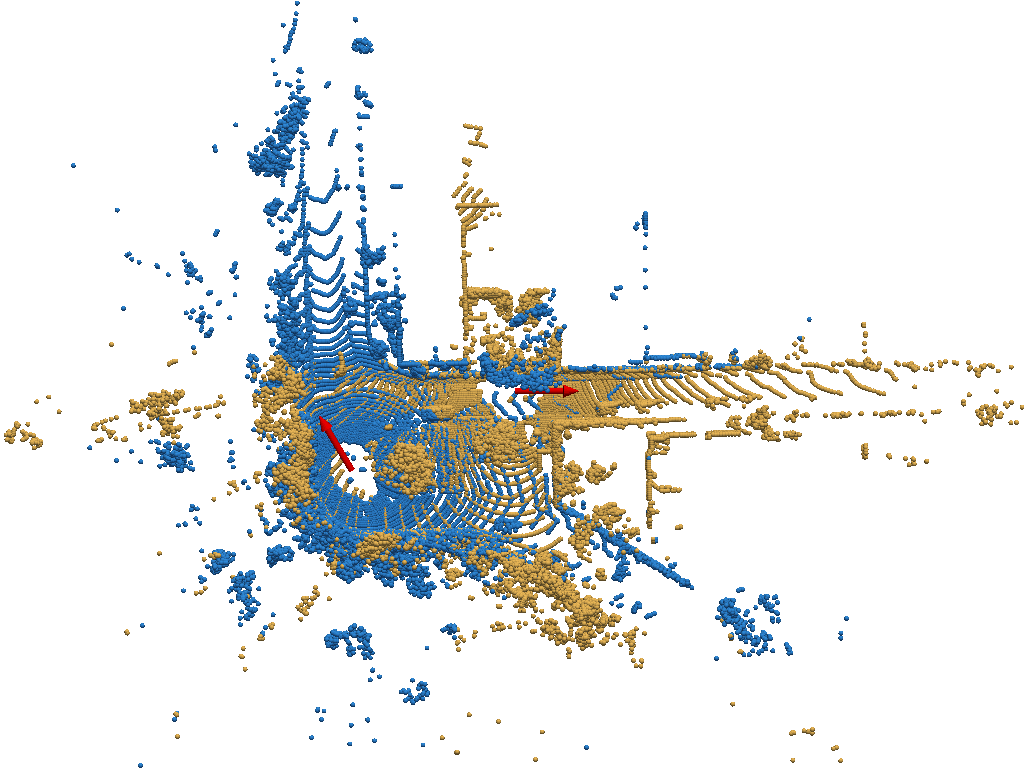
UMERegRobust – Universal Manifold Embedding Compatible Features for Robust Point Cloud Registration (ECCV 2024)
In this work, we adopt the Universal Manifold Embedding (UME) framework
for the estimation of rigid transformations and extend it, so that it can
accommodate scenarios involving partial overlap and differently sampled point clouds.
UME is a methodology designed for mapping observations of the same object,
related by rigid transformations, into a single low-dimensional linear subspace.
This process yields a transformation-invariant representation of the observations,
with its matrix form representation being covariant (i.e. equivariant) with the transformation.
We extend the UME framework by introducing a UME-compatible feature extraction method augmented
with a unique UME contrastive loss and a sampling equalizer.
These components are integrated into a comprehensive and robust registration pipeline,
named UMERegRobust. We propose the RotKITTI registration benchmark,
specifically tailored to evaluate registration methods for scenarios involving large rotations.
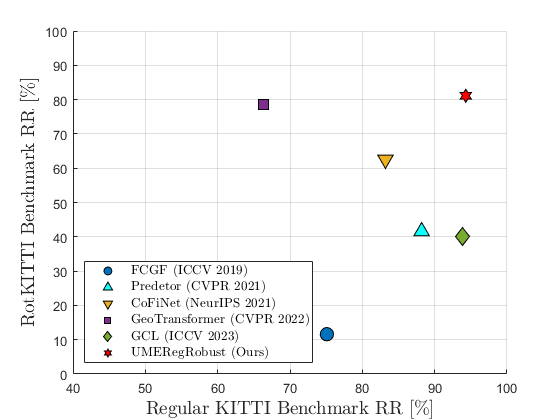
UMERegRobust achieves better than state-of-the-art performance on the KITTI benchmark,
especially when strict precision of $(1^\circ, 10cm)$ is considered (with an average gain of +9%),
and notably outperform SOTA methods on the RotKITTI benchmark
(with +45% gain compared the most recent SOTA method).
We also supply download links to the SEM already preprocessed data for both KITTI (test, lokitt, rotkitti) and nuScenes (test, lonuscenes, rotnuscens) registration benchmarks.
We suggest new registration benchmarks RotKITTI and RotNuscenes, these benchmarks focus on point cloud pairs with big relative rotations in the wild (not synthetic rotations).
Each benchmark contains registration problems with relative rotations ranging between 30-180 degrees. We encourage the comunity to test thier method on those benchmakrs.
@inproceedings{haitman2025umeregrobust,
  title={UMERegRobust-Universal Manifold Embedding Compatible Features for Robust Point Cloud Registration},
  author={Haitman, Yuval and Efraim, Amit and Francos, Joseph M},
  booktitle={European Conference on Computer Vision},
  pages={358--374},
  year={2025},
  organization={Springer}
}
Next.js blogging template for Netlify is a boilerplate for building blogs with only Netlify stacks.
There are some boilerplate or tutorials for the combination of Next.js and Netlify on GitHub. These resources have documentation and good tutorial to get started Next.js and Netlify quickly, but they are too simple to build blogs with standard features like tagging.
Next.js blogging template for Netlify has already implemented these standard features for building blogs with only using Next.js and Netlify stacks.
This template is just a template and a boilerplate in which users can customize anything after the project was cloned and started.
The following instructions introduce common customization points like adding new metadata or applying a new design theme.
Styling pages by a customized theme
All source codes related to the blog are under components and pages directory.
You can modify it freely if you want to apply your design theme.
All components use styled-jsx and css-modules to define their styles, but you can choose any styling libraries for designing your theme.
The directory tree containing the blog source code are described below:
meta: yaml files defining metadata like authors or tags
public: images, favicons and other static assets
src
├── assets: other assets using inside of components
├── components: pieces of components consisting of pages
├── content: mdx files for each post page
├── lib: project libraries like data fetching or pagination
└── pages: page components managing by Next.js
Organizing content by categories
The category metadata that associates with content have the same relationship with the authors’ one.
Then reference these implementations for adding new metadata:


 https://github.com/fabiosangregorio/links-disabler