As an experienced hacker (30+ hackathons), I have developed a list of things to pack for hackathons, and am sharing this with the world. Feel free to fork it or make pull requests to add your own items. To use, simply fork the repository, create an issue for an upcoming hackathon, and the issue will be prepopulated with the list below.
mac-hid-dump is a small command-line app to output the HID Report Descriptors of all connected HID devices. Think of it as sort of a MacOS version of usbhid-dump. It is designed to inspect HID devices for use with hidapi, node-hid, or similar HID libraries. The output can be parsed directly by the USB Descriptor Parser.
mac-hid-dump uses some of the Mac-specific code from libusb/hidapi, a cross-platform library for communicating with HID devies. It is not dependent on hidapi though.
Usage:
To use mac-hid-dump, download the zip file from the Releases page, unzip it, and run it.
This example shows a Teensy RawHID and a blink(1) USB LED. The Teensy RawHID descriptor shows a simple “RawHID” example of a single 64-byte report using no reportIDs for both Input and Output. The blink(1) descriptor shows an example that defines two reportID-based Feature reports: an 8-byte one and a 60-byte one.
You’ve found the Visual Studio Code documentation GitHub repository, which contains the content for the Visual Studio Code documentation.
Topics submitted here will be published to the Visual Studio Code portal.
If you are looking for the VS Code product GitHub repository, you can find it here.
Note: The vscode-docs repository uses Git LFS (Large File Storage) for storing binary files such as images and .gifs. If you are contributing or updating images, please enable Git LFS per the instructions in the Contributing section below.
VS Code is a lightweight source code editor and powerful development environment for building and debugging modern web, mobile, and cloud applications. It is free and available on your favorite platform – Linux, macOS, and Windows.
If you landed here looking for other information about VS Code, head over to our website for additional information.
Feedback
If you want to give documentation feedback, please use the feedback control located at the bottom of each documentation page.
Documentation Issues
To enter documentation bugs, please create a new GitHub issue. Please check if there is an existing issue first.
If you think the issue is with the VS Code product itself, please enter issues in the VS Code product repo here.
Contributing
To contribute new topics/information or make changes to existing documentation, please read the Contributing Guideline.
Workflow
The two suggested workflows are:
For small changes, use the “Edit” button on each page to edit the Markdown file directly on GitHub.
If you plan to make significant changes or preview the Markdown files in VS Code, clone the repo to edit and preview the files directly in VS Code.
Publishing merged pull requests is not automatic and is initiated manually after changes have been reviewed on an internal staging server. There is no specific time guarantee for when PR updates will be available on https://code.visualstudio.com but the intent is that they will usually be live within 24 hours.
Chatbot for Telegram platform that pulls every link it receives and saves it in a Google Drive spreadsheet to build a knowledge database and share it with the rest of your team.
The purpose of this chatbot is to take advantage of the already existing information sharing platforms in your team by gathering all the juicy articles and creating a knowledge repository from where you can choose to share to social media, internally or just save them for later.
Installation / Development setup
Run this in a terminal:
git clone https://github.com/joamadorrr/article-meeseeks.git

cd article-meeseeks

cp .env.example .env
We just created a file with all the environment variables you will require:
BOT_TOKEN: Once you’ve created your bot, talk to the BotFather and ask him for your bot’s token
SHEETS_SCOPE: Unles you want to do something weird, leave the default
RANGE_NAME: Read the A1 notation part in the link above
If you are setting up a development environment I highly recommend you use pipenv. Otherwise, you can install the requirements from the requirements.txt file.
Pipenv
Here we create an environment for the chatbot in python 3 and copy the last version of the development environment from the pipfile.lock
After you create your new Google Sheets Project, download the configuration file and move it to the chatbot’s root folder under the name credentials.json
Usage example
When ran for the first time, the browser is opened to authenticate a google account. After the first sign in, the credentials are saved in the token.json file, so it won’t prompt the browser again.
After deployment, basically just talk to it and send him links to cool articles you wanna share with your team. A really cool feature of Telegram bots is that you can make them join group conversations, so the Article Meeseeks can infiltrate different conversations and gather articles from those too.
Release History
0.1.0
The first proper release
Environment variables support added
0.0.1
It works but a lot of things need to be enhanced before “official launch”
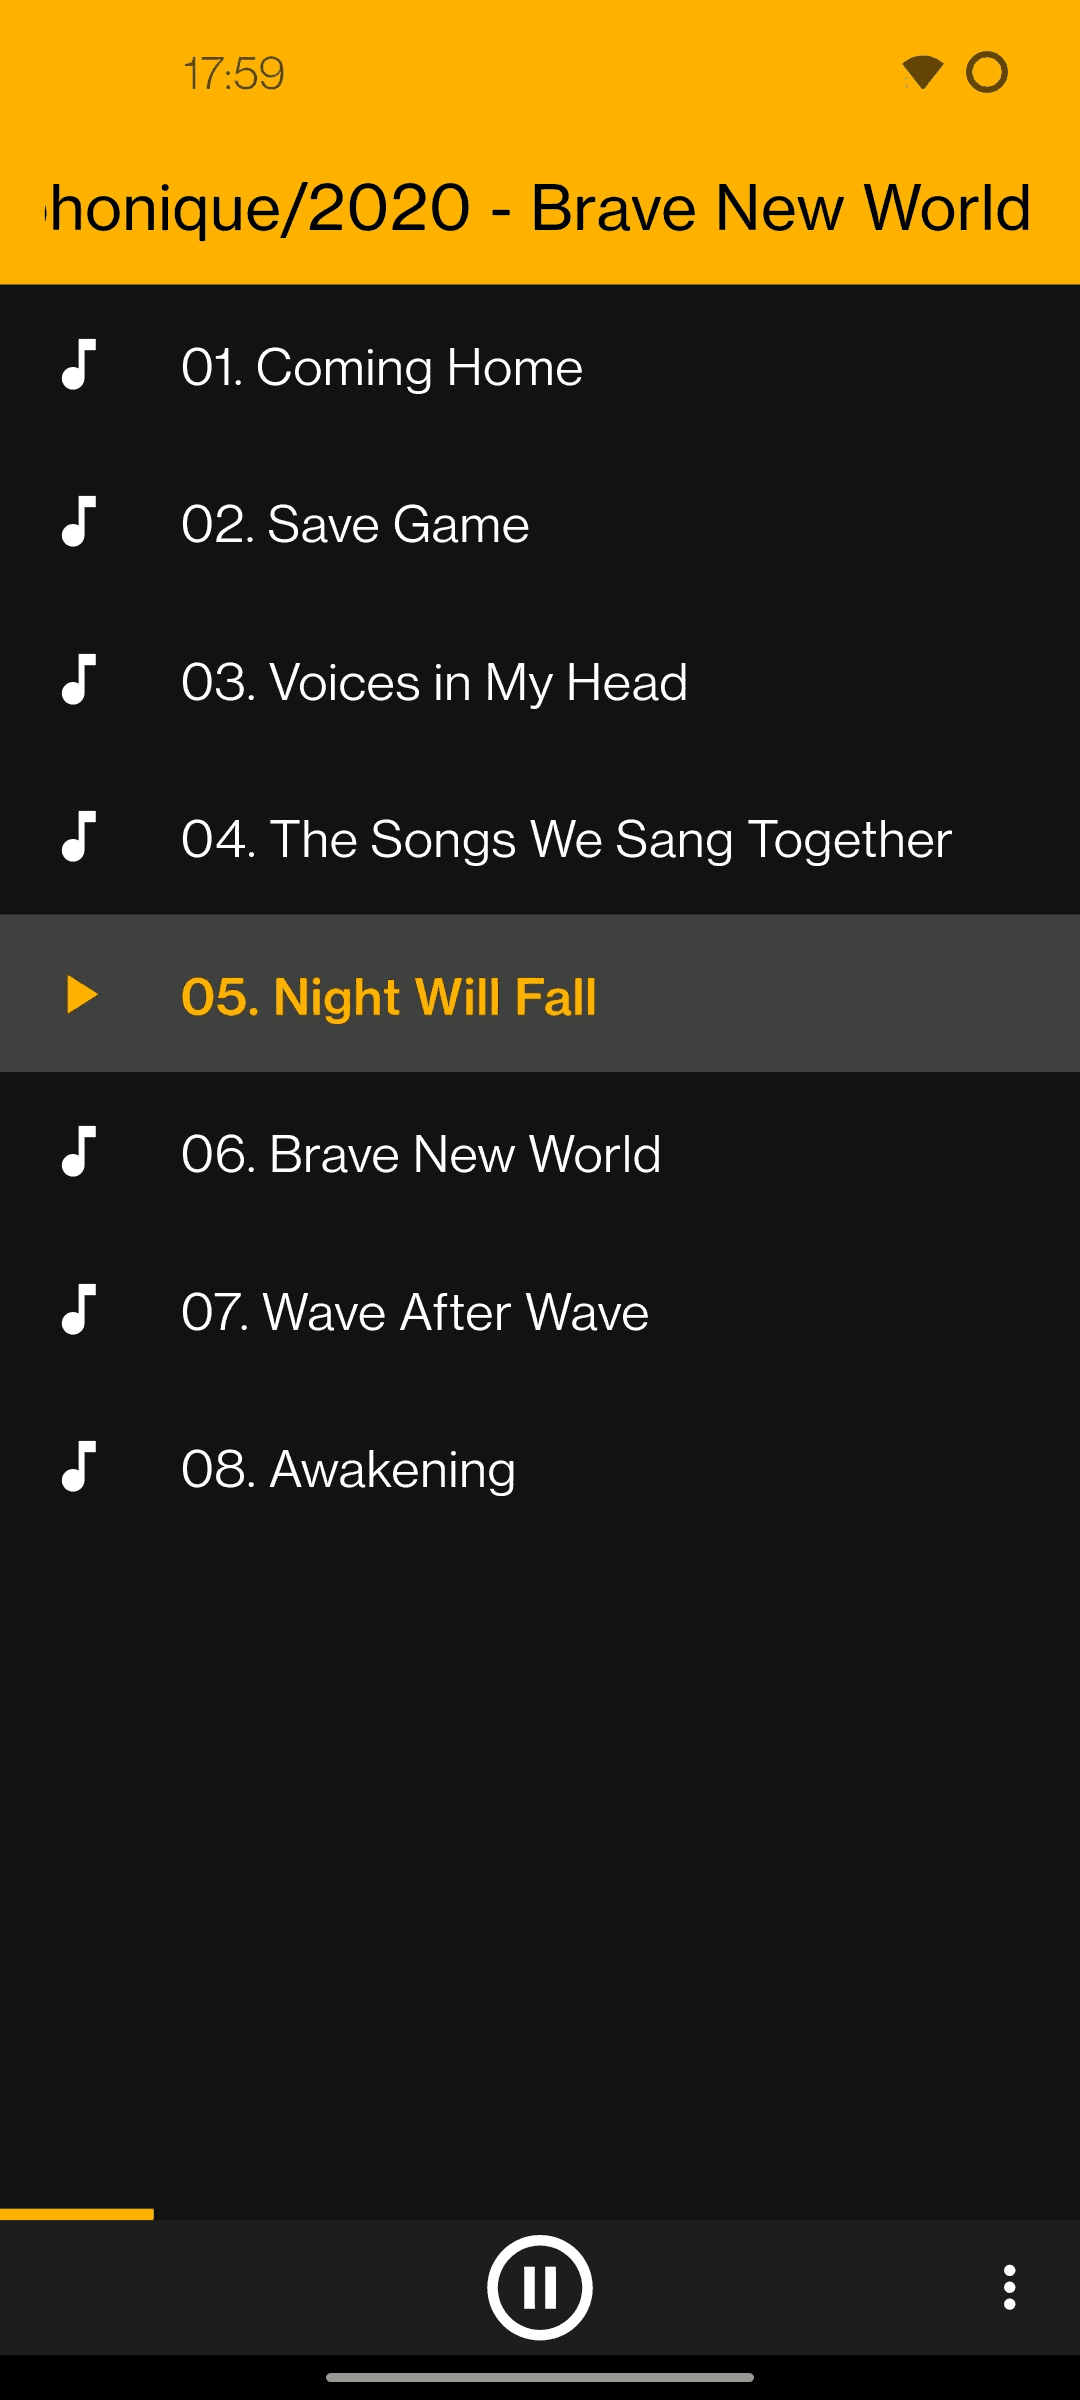
A bare-bones music player.
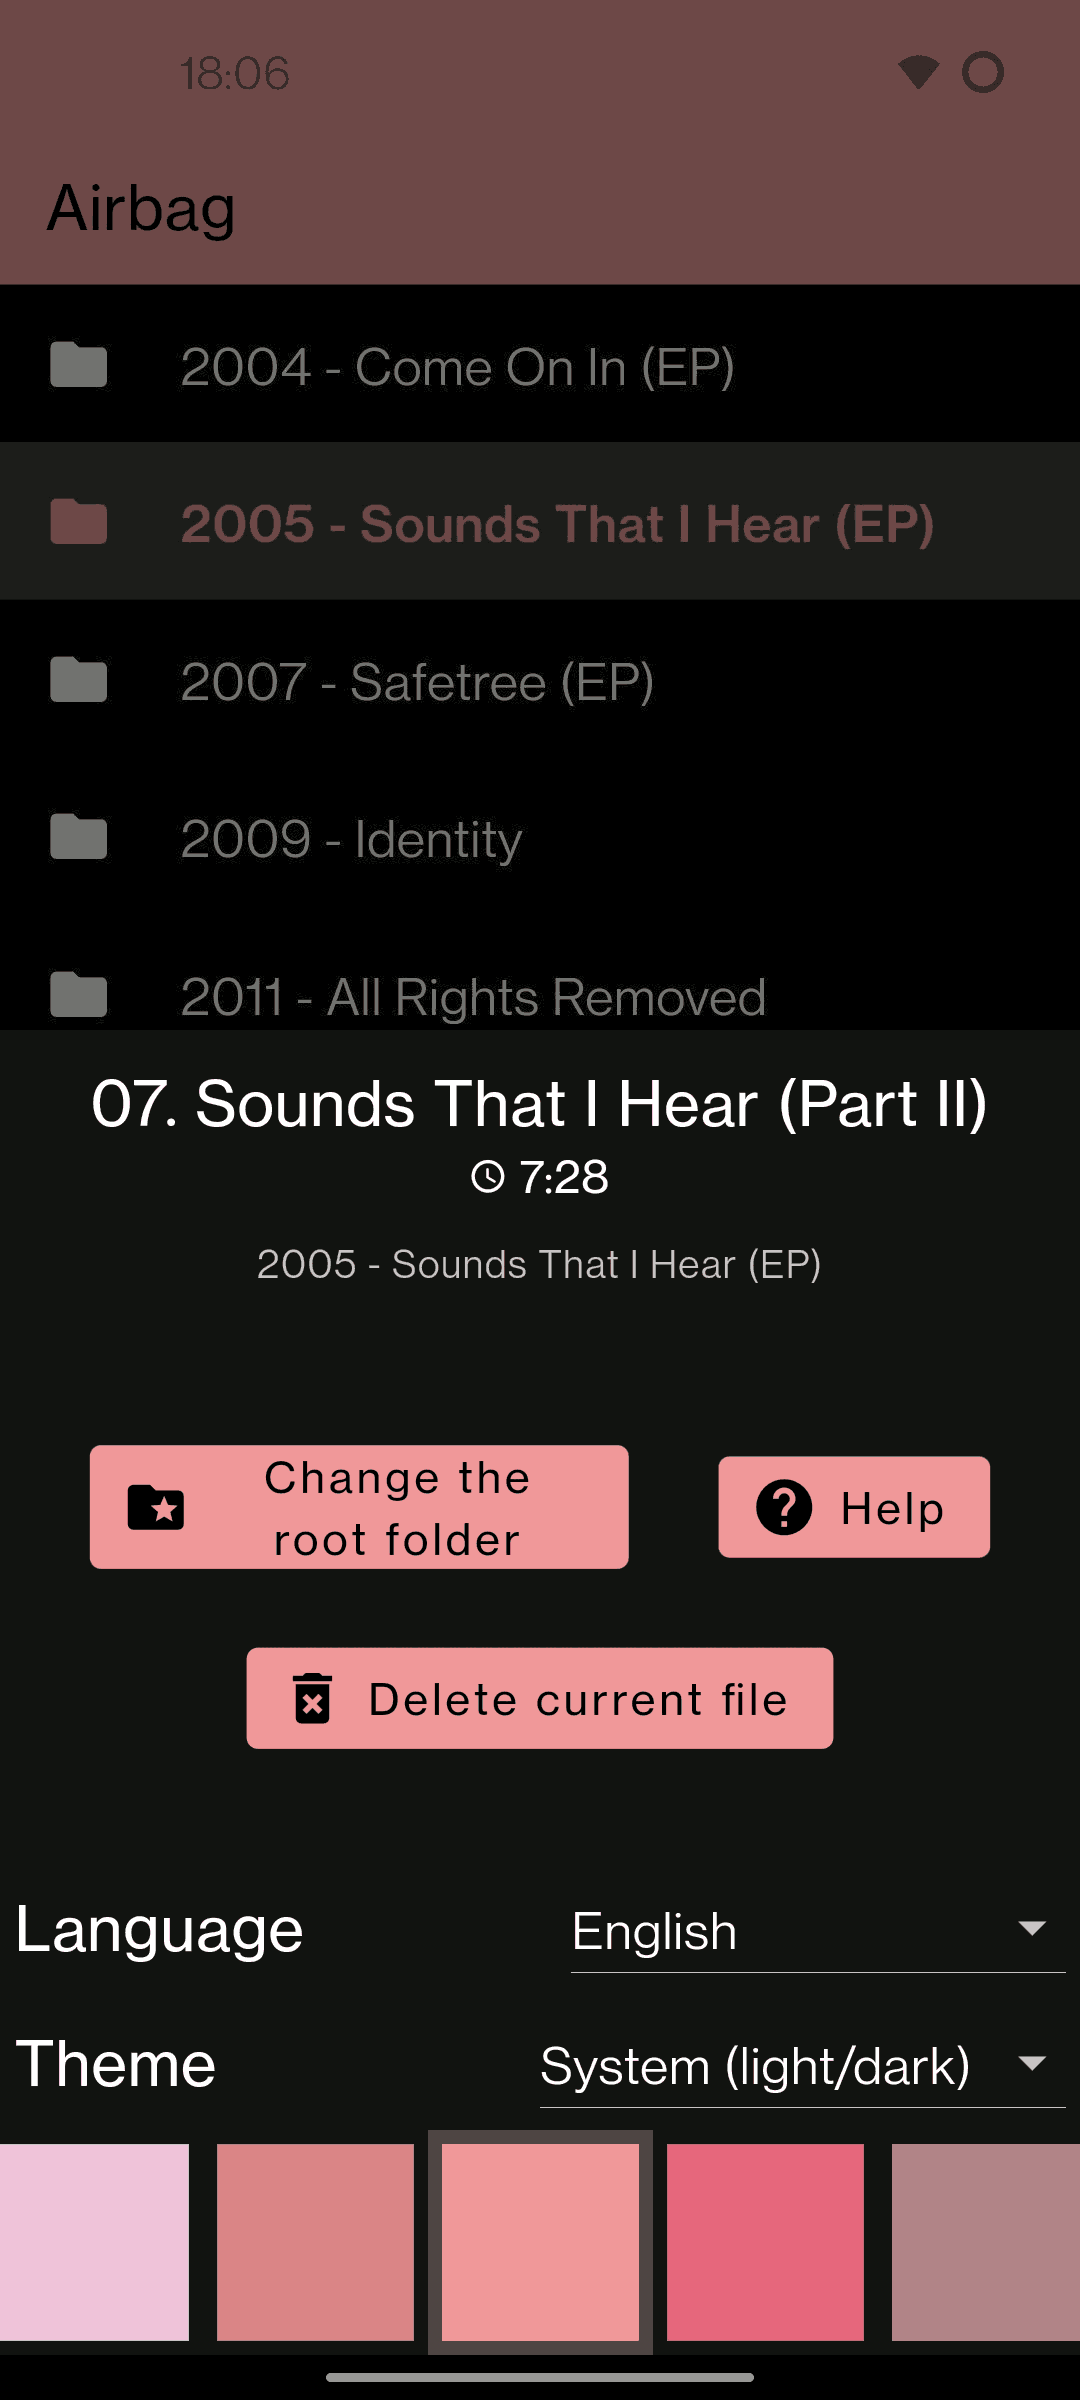
Intended to utilize a filesystem to browse your music instead of automatically grouping by artist, album or genre.
Focused on gesture controls.
Supports CUE sheets, M3U playlists and Internet radio.
Minimum supported Android version: 5.0 (Lollipop, API 21)
Features
Here’s what you can do in SonusPresto:
play music
browse your music in the way you have structured it, using the filesystem
play all files in a selected folder and sub-folders recursively
open CUE sheets and M3U playlists as folders
gapless playback
play Internet radio from M3U playlists
change a visual theme and language (English/Russian)
control a playback using touch and swipe gestures on a single button
listen to the audio from the video files
delete files and folders
Non-features
Here’s what SonusPresto can’t do:
view audio tags or cover art
quickly set a precise playback position
view the current playback position in seconds
use a separate buttons to control a playback (i.e. there’s no separate prev/stop/next/… buttons)
create custom playlists or manage a playback queue
basically, anything else that is not listed in the “Features” section 🙂
Disclaimer: new features will most likely never be added.
Specifics
Here are some quirks:
the swiping of the bottom button may not work on some devices with specific Android gesture settings
since SonusPresto doesn’t read tags, it can’t determine actual artist and album name of a music track and instead it just uses folder names for that (except for playlist items)
SonusPresto may not be compatible with LastFM scrobblers, i.e. it will most likely send incorrect info because it does not use tags
SonusPresto doesn’t know what formats your device supports, so it will just show every file that has any of the supported extensions
(i.e. not all displayed files can actually be played)
Install Flutter and Android SDK. It’s easier to do it from Android Studio.
At this point you can already debug the application from Android Studio.
To build the release version follow the next steps.
Go inside the repository root and create the file
android/key.properties based on android/key.template.properties.
Fill in all fields.
For more information see the official “Signing the app” tutorial.
To build the release APK run ./build-apk.sh inside the repository root.
Laravel is a web application framework with expressive, elegant syntax. We believe development must be an enjoyable and creative experience to be truly fulfilling. Laravel takes the pain out of development by easing common tasks used in many web projects, such as:
Laravel is accessible, powerful, and provides tools required for large, robust applications.
Learning Laravel
Laravel has the most extensive and thorough documentation and video tutorial library of all modern web application frameworks, making it a breeze to get started with the framework.
You may also try the Laravel Bootcamp, where you will be guided through building a modern Laravel application from scratch.
If you don’t feel like reading, Laracasts can help. Laracasts contains over 2000 video tutorials on a range of topics including Laravel, modern PHP, unit testing, and JavaScript. Boost your skills by digging into our comprehensive video library.
Laravel Sponsors
We would like to extend our thanks to the following sponsors for funding Laravel development. If you are interested in becoming a sponsor, please visit the Laravel Patreon page.
Thank you for considering contributing to the Laravel framework! The contribution guide can be found in the Laravel documentation.
Code of Conduct
In order to ensure that the Laravel community is welcoming to all, please review and abide by the Code of Conduct.
Security Vulnerabilities
If you discover a security vulnerability within Laravel, please send an e-mail to Taylor Otwell via taylor@laravel.com. All security vulnerabilities will be promptly addressed.
License
The Laravel framework is open-sourced software licensed under the MIT license.
While working as a consultant for an integration consultancy, we had a client who wanted to be able to ingest the client list data set from WorkflowMax into SQL.
The client data set consists of basic client information (name, email etc) and a list of the client contacts, of which there might be one or more.
WorkflowMax exposes its data sets in XML, the process of getting the data set from WorkflowMax is quite trivial,
Get an access token,
Get the client list.
Store the result in blob storage.
Trigger an Azure Data Factory pipeline
a. To convert the XML to JSON.
b. Store th JSON file in blob storage.
c. Within the pipeline, insert or upsert top level client details into the database.
In order to handle the list of contacts, the outputed json file has to be processed. However for some reason, the azure data factory copy activity, produces an array of contacts when there are multiple contacts, but an object of contacts when there is just one contact.
The json file can be processed by a logic app, however there is no simple way to handle processing elements where the schema contains an object or an array for the same element.
Thanks for checking out this front-end coding challenge.
Frontend Mentor challenges help you improve your coding skills by building realistic projects.
To do this challenge, you need a basic understanding of HTML and CSS.
The challenge
Your challenge is to build out this social links profile and get it looking as close to the design as possible.
You can use any tools you like to help you complete the challenge. So if you’ve got something you’d like to practice, feel free to give it a go.
Your users should be able to:
See hover and focus states for all interactive elements on the page
Want some support on the challenge? Join our community and ask questions in the #help channel.
Where to find everything
Your task is to build out the project to the designs inside the /design folder. You will find both a mobile and a desktop version of the design.
The designs are in JPG static format. Using JPGs will mean that you’ll need to use your best judgment for styles such as font-size, padding and margin.
If you would like the design files (we provide Sketch & Figma versions) to inspect the design in more detail, you can subscribe as a PRO member.
All the required assets for this project are in the /assets folder. The images are already exported for the correct screen size and optimized.
We also include variable and static font files for the required fonts for this project. You can choose to either link to Google Fonts or use the local font files to host the fonts yourself. Note that we’ve removed the static font files for the font weights that aren’t needed for this project.
There is also a style-guide.md file containing the information you’ll need, such as color palette and fonts.
Building your project
Feel free to use any workflow that you feel comfortable with. Below is a suggested process, but do not feel like you need to follow these steps:
Initialize your project as a public repository on GitHub. Creating a repo will make it easier to share your code with the community if you need help. If you’re not sure how to do this, have a read-through of this Try Git resource.
Configure your repository to publish your code to a web address. This will also be useful if you need some help during a challenge as you can share the URL for your project with your repo URL. There are a number of ways to do this, and we provide some recommendations below.
Look through the designs to start planning out how you’ll tackle the project. This step is crucial to help you think ahead for CSS classes to create reusable styles.
Before adding any styles, structure your content with HTML. Writing your HTML first can help focus your attention on creating well-structured content.
Write out the base styles for your project, including general content styles, such as font-family and font-size.
Start adding styles to the top of the page and work down. Only move on to the next section once you’re happy you’ve completed the area you’re working on.
Deploying your project
As mentioned above, there are many ways to host your project for free. Our recommend hosts are:
We strongly recommend overwriting this README.md with a custom one. We’ve provided a template inside the README-template.md file in this starter code.
The template provides a guide for what to add. A custom README will help you explain your project and reflect on your learnings. Please feel free to edit our template as much as you like.
Once you’ve added your information to the template, delete this file and rename the README-template.md file to README.md. That will make it show up as your repository’s README file.
Remember, if you’re looking for feedback on your solution, be sure to ask questions when submitting it. The more specific and detailed you are with your questions, the higher the chance you’ll get valuable feedback from the community.
Sharing your solution
There are multiple places you can share your solution:
Share your solution page in the #finished-projects channel of our community.
Tweet @frontendmentor and mention @frontendmentor, including the repo and live URLs in the tweet. We’d love to take a look at what you’ve built and help share it around.
Share your solution on other social channels like LinkedIn.
Blog about your experience building your project. Writing about your workflow, technical choices, and talking through your code is a brilliant way to reinforce what you’ve learned. Great platforms to write on are dev.to, Hashnode, and CodeNewbie.
We provide templates to help you share your solution once you’ve submitted it on the platform. Please do edit them and include specific questions when you’re looking for feedback.
The more specific you are with your questions the more likely it is that another member of the community will give you feedback.
Got feedback for us?
We love receiving feedback! We’re always looking to improve our challenges and our platform. So if you have anything you’d like to mention, please email hi[at]frontendmentor[dot]io.
This challenge is completely free. Please share it with anyone who will find it useful for practice.
| A restore point for sync your settings and preferences in your toolbox.
Why it’s awesome
Dotfiles provides a fast setup for backup, restore, and sync the prefs and settings for your toolbox. Dotfiles might be the most important files on your machine and I hope it helps you as much as it helps me!
The Terminal is an interface that allows you to access the command line from the GUI.
Bash Settings
First create Bash Profile file touch ~/.bash_profile and add this content:
source $HOME/.git-prompt.sh
# PS1="\[\033[1;36m\]\u\[\033[32m\]$(__git_ps1 " (\W/%s)")\[\033[0m\] $ "
PS1="\[\033[1;36m\]\u\[\033[32m\]\$(__git_ps1)\[\033[0m\] $ "

alias cls="clear"
alias reload="source $HOME/.bash_profile"
alias www="cd $HOME/Www/"

export PATH="/usr/local/bin:$PATH"
export PATH="/usr/local/sbin:$PATH"

. $HOME/.asdf/asdf.sh
macOS
macOS is a series of graphical operating systems developed and marketed by Apple Inc.
xcode-select --install
macOS Settings
LockScreen: Set Lock Message to show on login screen defaults write com.apple.loginwindow LoginwindowText -string "Found me? Shoot a mail to cjpatoilo@gmail.com to return me. Thanks!"
Bluetooth: Increase sound quality for Bluetooth headphones/headsets defaults write com.apple.BluetoothAudioAgent "Apple Bitpool Min (editable)" -int 40
Finder: Show all filenames extensions defaults write NSGlobalDomain AppleShowAllExtensions -bool true
Finder: Show hidden files by default defaults write com.apple.finder AppleShowAllFiles -bool true
Finder: Show status bar defaults write com.apple.finder ShowStatusBar -bool true
Finder: Show path bar defaults write com.apple.finder ShowPathbar -bool true
Finder: Keep folders on top when sorting by name defaults write com.apple.finder _FXSortFoldersFirst -bool true
Finder: When performing a search, search the current folder by default defaults write com.apple.finder FXDefaultSearchScope -string "SCcf"
Finder: Disable the warning when changing a file extension defaults write com.apple.finder FXEnableExtensionChangeWarning -bool false
Finder: Avoid creating .DS_Store files on network or USB volumes defaults write com.apple.desktopservices DSDontWriteNetworkStores -bool true defaults write com.apple.desktopservices DSDontWriteUSBStores -bool true
Finder: Allow text selection in Quick Look defaults write com.apple.finder QLEnableTextSelection -bool true
Finder: Disable the warning when changing a file extension defaults write com.apple.finder FXEnableExtensionChangeWarning -bool false
TextEdit: Use plain text mode for new TextEdit documents defaults write com.apple.TextEdit RichText -int 0
TextEdit: Open and save files as UTF-8 in TextEdit defaults write com.apple.TextEdit PlainTextEncoding -int 4 defaults write com.apple.TextEdit PlainTextEncodingForWrite -int 4
Screen: Save screenshots to the downloads defaults write com.apple.screencapture location -string "$HOME/Downloads"
Screen: Save screenshots in PNG format (other options: BMP, GIF, JPG, PDF, TIFF) defaults write com.apple.screencapture type -string "png"
Terminal: Disable the annoying line marks defaults write com.apple.Terminal ShowLineMarks -int 0
Time Machine: Prevent Time Machine from prompting to use new hard drives as backup volume defaults write com.apple.TimeMachine DoNotOfferNewDisksForBackup -bool true
Time Machine: Disable local Time Machine backups hash tmutil &> /dev/null && sudo tmutil disablelocal
Activity Monitor: Show the main window when launching Activity Monitor defaults write com.apple.ActivityMonitor OpenMainWindow -bool true
Activity Monitor: Visualize CPU usage in the Activity Monitor Dock icon defaults write com.apple.ActivityMonitor IconType -int 5
Activity Monitor: Show all processes in Activity Monitor defaults write com.apple.ActivityMonitor ShowCategory -int 0