Category: Blog

  • video_features

    Video Features

    video_features allows you to extract features from video clips. It supports a variety of extractors and modalities, i.e. visual appearance, optical flow, and audio. See more details in Documentation.

    Supported Models

    Action Recognition

    Sound Recognition

    Optical Flow

    Frame-wise Features

    Quick Start

    Open In Colab

    or run with conda locally:

    # clone the repo and change the working directory
    git clone https://github.com/v-iashin/video_features.git
    cd video_features
    
    # install environment
    conda env create -f conda_env.yml
    
    # load the environment
    conda activate video_features
    
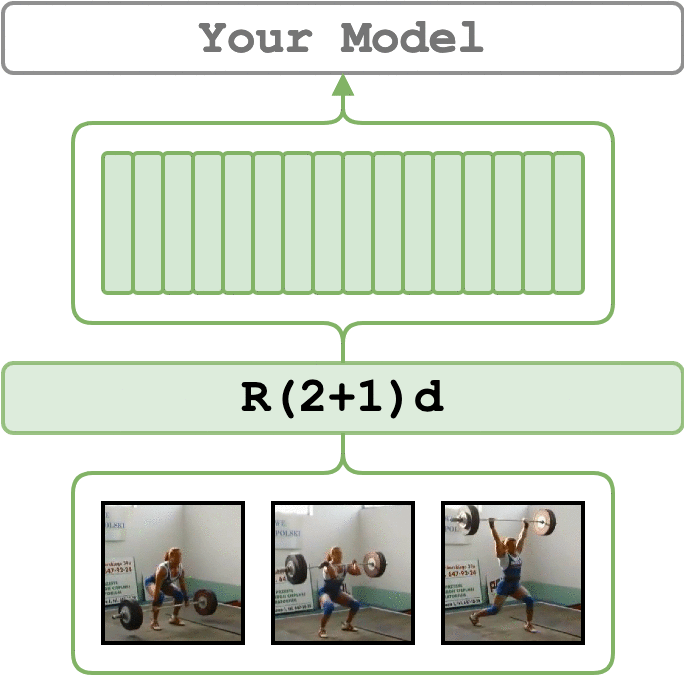
    # extract r(2+1)d features for the sample videos
    python main.py \
        feature_type=r21d \
        device="cuda:0" \
        video_paths="[./sample/v_ZNVhz7ctTq0.mp4, ./sample/v_GGSY1Qvo990.mp4]"
    
    # if you have many GPUs, just run this command from another terminal with another device
    # device can also be "cpu"

    If you are more comfortable with Docker, there is a Docker image with a pre-installed environment that supports all models. Check out the Docker support. documentation page.

    Multi-GPU and Multi-Node Setups

    With video_features, it is easy to parallelize feature extraction among many GPUs. It is enough to start the script in another terminal with another GPU (or even the same one) pointing to the same output folder and input video paths. The script will check if the features already exist and skip them. It will also try to load the feature file to check if it is corrupted (i.e. not openable). This approach allows you to continue feature extraction if the previous script failed for some reason.

    If you have an access to a GPU cluster with shared disk space you may scale extraction with as many GPUs as you can by creating several single-GPU jobs with the same command.

    Since each time the script is run the list of input files is shuffled, you don’t need to worry that workers will be processing the same video. On a rare occasion when the collision happens, the script will rewrite previously extracted features.

    Input

    The inputs are paths to video files. Paths can be passed as a list of paths to videos or as a text file formatted with a single path per line.

    Output

    Output is defined by the on_extraction argument; by default it prints the features to the command line. Possible values of output are ['print', 'save_numpy', 'save_pickle']. save_* options save the features in the output_path folder with the same name as the input video file but with the .npy or .pkl extension.

    Used in

    Please, let me know if you found this repo useful for your projects or papers.

    Acknowledgements

    • @Kamino666: added CLIP model as well as Windows and CPU support (and many other useful things).
    • @ohjho: added support of 37-layer R(2+1)d favors.
    • @borijang: for solving bugs with file names, I3D checkpoint loading enhancement and code style improvements.
    • @bjuncek: for helping with timm models and offline discussion.

    Citation

    If you find this project useful in your research, please consider cite:

    @misc{videofeatures2020,
      title = {Video Features},
      author = {Vladimir Iashin and other contributors},
      year = {2020},
      howpublished = {\url{https://github.com/v-iashin/video_features}},
    }
    Visit original content creator repository https://github.com/v-iashin/video_features
  • nftx

    NFTX

    This project is my first attempt at using Hardhat and developing a Solidity Smart Contract.

    The contract is not optimized for performance, and I was mainly trying to swap/trade ERC721 tokens between two wallets.

    The test initiates a trade offer which asks for the initiator to send 4 Bored Ape Yacht Club NFTs and receive 2 in return. The second user accepts the trade and the NFTS are swapped/traded between the two.

    There is no frontend, besides the create-react-app template.

    Advanced Sample Hardhat Project

    Try running some of the following tasks:

    npx hardhat accounts
    npx hardhat compile
    npx hardhat clean
    npx hardhat test
    npx hardhat node
    npx hardhat help
    REPORT_GAS=true npx hardhat test
    npx hardhat coverage
    npx hardhat run scripts/deploy.ts
    TS_NODE_FILES=true npx ts-node scripts/deploy.ts
    npx eslint '**/*.{js,ts}'
    npx eslint '**/*.{js,ts}' --fix
    npx prettier '**/*.{json,sol,md}' --check
    npx prettier '**/*.{json,sol,md}' --write
    npx solhint 'contracts/**/*.sol'
    npx solhint 'contracts/**/*.sol' --fix

    Etherscan verification

    To try out Etherscan verification, you first need to deploy a contract to an Ethereum network that’s supported by Etherscan, such as Ropsten.

    In this project, copy the .env.example file to a file named .env, and then edit it to fill in the details. Enter your Etherscan API key, your Ropsten node URL (eg from Alchemy), and the private key of the account which will send the deployment transaction. With a valid .env file in place, first deploy your contract:

    hardhat run --network ropsten scripts/sample-script.ts

    Then, copy the deployment address and paste it in to replace DEPLOYED_CONTRACT_ADDRESS in this command:

    npx hardhat verify --network ropsten DEPLOYED_CONTRACT_ADDRESS "Hello, Hardhat!"

    Performance optimizations

    For faster runs of your tests and scripts, consider skipping ts-node’s type checking by setting the environment variable TS_NODE_TRANSPILE_ONLY to 1 in hardhat’s environment. For more details see the documentation.

    Visit original content creator repository
    https://github.com/zgidaro/nftx

  • Animal-Crossing-Amiibo

    Animal Crossing Amiibo

    Step-by-step instructions on how to recreate Amiibo cards for Animal Crossing: New Horizons. For educational purposes only.

    Disclaimer

    This repo is for educational purposes only, clone at your own risk. I do not own any of the Amiibo contents posted, nor am I encouraging any behavior. All rights go to Nintendo.

    Required Materials

    • Android
      • Android Phone (with NFC capabilities)
      • Google Play account
    • iOS
      • iPhone 7 or later (iPads don’t have the NFC module required)
      • App Store account
    • Blank NFC 215 tags (NTAG215) (any card/sticker will do, must be blank and NTAG215. This is what official Amiibos use. 213, 216 and other commonly found tags will not work!)

    iOS Instructions

    1. Download iOS app Tagmiibo.
    2. Follow the instructions here.

    Android Instructions

    Set-up

    1. Download all contents in this repo using $ git clone or download as .zip

    2. Using the same Google account as your Google Play account, save all contents into a Google Drive folder.

    3. Go to your Android Phone, under Settings > Security, find Unknown Sources and turn it on.

    4. Use your phone to access the Google Drive folder > TagMo_Installer folder, install TagMo.apk, which is the latest release of the TagMo app grabbed from their GitHub.

    5. Launch the TagMo app, click the menu icon on the upper right corner > Load key(s) file, and select the unfixed-info.bin and locked-secret.bin files also found in the TagMo_Installer folder in your Google Drive folder.

    Cloning Amiibos

    • Click LOAD TAG to load Amiibo data of the villager you want.
    • Click SAVE TAG to save chosen Amiibo data on to the tag of your choice.

    *Be aware that the NFC tags are NOT re-writable in this case, as official Nintendo Amiibos also lock in character data during manufacturing to prevent accidental rewrites/deletions. Ours need to do the same to fool your Switch and your ACNH game copy. So if you want to make more than one villager, the smart thing to do would be to buy the NFC tags in bulk just to be safe.

    Credits

    • Nintendo – All Amiibo data belongs to Nintendo, courtesy of NFC-Bank (site was shut down in late 2020).
    • u/amiibolover99 – Special thanks to u/amiibolover99 for providing Series 5 .bin data ripped from real Amiibo cards.
    • TagMo – without them NFC cloning is impossible (all other apps suck).
    • Miffy Chen – Software Engineer / Technical Project Manager at Bolt.
      On a mission to democratize commerce. We are hiring, happy to refer!

    Visit original content creator repository
    https://github.com/miffycs/Animal-Crossing-Amiibo

  • aioodbc

    aioodbc

    GitHub Actions status for master branch Chat on Gitter

    aioodbc is a Python 3.7+ module that makes it possible to access ODBC databases with asyncio. It relies on the awesome pyodbc library and preserves the same look and feel. Internally aioodbc employs threads to avoid blocking the event loop, threads are not that as bad as you think!. Other drivers like motor use the same approach.

    aioodbc is fully compatible and tested with uvloop. Take a look at the test suite, all tests are executed with both the default event loop and uvloop.

    Basic Example

    aioodbc is based on pyodbc and provides the same api, you just need to use yield from conn.f() or await conn.f() instead of conn.f()

    Properties are unchanged, so conn.prop is correct as well as conn.prop = val.

    import asyncio
    
    import aioodbc
    
    
    async def test_example():
        dsn = "Driver=SQLite;Database=sqlite.db"
        conn = await aioodbc.connect(dsn=dsn)
    
        cur = await conn.cursor()
        await cur.execute("SELECT 42 AS age;")
        rows = await cur.fetchall()
        print(rows)
        print(rows[0])
        print(rows[0].age)
        await cur.close()
        await conn.close()
    
    
    asyncio.run(test_example())

    Connection Pool

    Connection pooling is ported from aiopg and relies on PEP492 features:

    import asyncio
    
    import aioodbc
    
    
    async def test_pool():
        dsn = "Driver=SQLite3;Database=sqlite.db"
        pool = await aioodbc.create_pool(dsn=dsn)
    
        async with pool.acquire() as conn:
            cur = await conn.cursor()
            await cur.execute("SELECT 42;")
            r = await cur.fetchall()
            print(r)
            await cur.close()
            await conn.close()
        pool.close()
        await pool.wait_closed()
    
    
    asyncio.run(test_pool())

    Context Managers

    Pool, Connection and Cursor objects support the context management protocol:

    import asyncio
    
    import aioodbc
    
    
    async def test_example():
        dsn = "Driver=SQLite;Database=sqlite.db"
    
        async with aioodbc.create_pool(dsn=dsn) as pool:
            async with pool.acquire() as conn:
                async with conn.cursor() as cur:
                    await cur.execute("SELECT 42 AS age;")
                    val = await cur.fetchone()
                    print(val)
                    print(val.age)
    
    
    asyncio.run(test_example())

    Installation

    In a linux environment pyodbc (hence aioodbc) requires the unixODBC library. You can install it using your package manager, for example:

    $ sudo apt-get install unixodbc
    $ sudo apt-get install unixodbc-dev
    

    Then:

    pip install aioodbc
    

    Run tests

    To run tests locally without docker, install unixodbc and sqlite driver:

    $ sudo apt-get install unixodbc
    $ sudo apt-get install libsqliteodbc
    

    Create virtualenv and install package with requirements:

    $ pip install -r requirements-dev.txt
    

    Run tests, lints etc:

    $ make fmt
    $ make lint
    $ make test
    

    Other SQL Drivers

    • aiopg – asyncio client for PostgreSQL
    • aiomysql – asyncio client form MySQL

    Requirements

    Visit original content creator repository https://github.com/aio-libs/aioodbc
  • test-calendar

    This project was bootstrapped with Create React App.

    Available Scripts

    In the project directory, you can run:

    npm start

    Runs the app in the development mode.
    Open http://localhost:3000 to view it in the browser.

    The page will reload if you make edits.
    You will also see any lint errors in the console.

    npm test

    Launches the test runner in the interactive watch mode.
    See the section about running tests for more information.

    npm run build

    Builds the app for production to the build folder.
    It correctly bundles React in production mode and optimizes the build for the best performance.

    The build is minified and the filenames include the hashes.
    Your app is ready to be deployed!

    See the section about deployment for more information.

    npm run eject

    Note: this is a one-way operation. Once you eject, you can’t go back!

    If you aren’t satisfied with the build tool and configuration choices, you can eject at any time. This command will remove the single build dependency from your project.

    Instead, it will copy all the configuration files and the transitive dependencies (Webpack, Babel, ESLint, etc) right into your project so you have full control over them. All of the commands except eject will still work, but they will point to the copied scripts so you can tweak them. At this point you’re on your own.

    You don’t have to ever use eject. The curated feature set is suitable for small and middle deployments, and you shouldn’t feel obligated to use this feature. However we understand that this tool wouldn’t be useful if you couldn’t customize it when you are ready for it.

    Learn More

    You can learn more in the Create React App documentation.

    To learn React, check out the React documentation.

    Code Splitting

    This section has moved here: https://facebook.github.io/create-react-app/docs/code-splitting

    Analyzing the Bundle Size

    This section has moved here: https://facebook.github.io/create-react-app/docs/analyzing-the-bundle-size

    Making a Progressive Web App

    This section has moved here: https://facebook.github.io/create-react-app/docs/making-a-progressive-web-app

    Advanced Configuration

    This section has moved here: https://facebook.github.io/create-react-app/docs/advanced-configuration

    Deployment

    This section has moved here: https://facebook.github.io/create-react-app/docs/deployment

    npm run build fails to minify

    This section has moved here: https://facebook.github.io/create-react-app/docs/troubleshooting#npm-run-build-fails-to-minify

    Visit original content creator repository
    https://github.com/erikfenriz/test-calendar

  • DraggableFlagView

    DraggableFlagView

    可拖拽的红点,(仿新版QQ,tab下面拖拽标记为已读的效果),拖拽一定的距离可以消失回调。

    main.xml

        <com.wangjie.draggableflagview.DraggableFlagView
                    xmlns:dfv="http://schemas.android.com/apk/res/com.wangjie.draggableflagview"
                    android:id="@+id/main_dfv"
                    android:layout_width="20dp"
                    android:layout_height="20dp"
                    android:layout_alignParentBottom="true"
                    android:layout_margin="15dp"
                    dfv:color="#FF3B30"
                    />
    

    MainActivity:

        public class MainActivity extends Activity implements DraggableFlagView.OnDraggableFlagViewListener, View.OnClickListener {
        
            @Override
            public void onCreate(Bundle savedInstanceState) {
                super.onCreate(savedInstanceState);
                setContentView(R.layout.main);
                findViewById(R.id.main_btn).setOnClickListener(this);
        
                DraggableFlagView draggableFlagView = (DraggableFlagView) findViewById(R.id.main_dfv);
                draggableFlagView.setOnDraggableFlagViewListener(this);
                draggableFlagView.setText("7");
            }
        
            @Override
            public void onFlagDismiss(DraggableFlagView view) {
                Toast.makeText(this, "onFlagDismiss", Toast.LENGTH_SHORT).show();
            }
        
            @Override
            public void onClick(View v) {
                switch (v.getId()) {
                    case R.id.main_btn:
                        Toast.makeText(this, "hello world", Toast.LENGTH_SHORT).show();
                        break;
                }
            }
        }
    

    License

    Copyright 2015 Wang Jie
    
    Licensed under the Apache License, Version 2.0 (the "License");
    you may not use this file except in compliance with the License.
    You may obtain a copy of the License at
    
       http://www.apache.org/licenses/LICENSE-2.0
    
    Unless required by applicable law or agreed to in writing, software
    distributed under the License is distributed on an "AS IS" BASIS,
    WITHOUT WARRANTIES OR CONDITIONS OF ANY KIND, either express or implied.
    See the License for the specific language governing permissions and
    limitations under the License.
    

    Android Arsenal

    Visit original content creator repository https://github.com/wangjiegulu/DraggableFlagView
  • YachtChat

    Yacht.Chat

    Yacht.Chat is built on a robust and modern technological architecture, focusing on scalability, security, and low-latency communication. Here’s a detailed breakdown of the technology stack:

    Backend: Spring

    The backend of Yacht.Chat is crafted on the Spring Framework. Spring is a renowned, open-source application framework. Its flexibility and scalability make it a perfect choice.

    Frontend: TypeScript, React

    On the frontend, Yacht.Chat employs the React library and TypeScript. React, a widely-used JavaScript library for building user interfaces, combined with TypeScript, a statically typed superset of JavaScript, ensures reliability and maintainability of the codebase.

    Real-time Communication: Peer-to-Peer Technology and Selective Forward Unit

    For real-time video conferencing, Yacht.Chat uses peer-to-peer technology. This direct data transfer method reduces the load on servers, ensuring efficient communication. Along with this, a Selective Forward Unit (SFU) is used, capable of receiving multiple media streams and deciding which to forward. This feature further optimizes real-time video communication during multi-party conferences.

    Authentication: Keycloak, Google, LinkedIn

    In the domain of user authentication, Yacht.Chat integrates Keycloak, an open-source Identity and Access Management solution. Keycloak provides advanced security features such as Single-Sign On, Identity Brokering and Social Login, User Federation, and Client Adapters.

    Furthermore, Yacht.Chat allows users to log in using their Google or LinkedIn accounts. This feature not only makes the login process convenient and user-friendly but also maintains high security and privacy standards.

    Easy to Deploy Yacht.Chat on your Server

    You can just follow the XX steps to deploy Yacht.Chat on-premise on your server.

    1. Fork the project
    2. Set up a server (minimal requirements 8GB RAM)
    3. Set your domain in the .env file (replace yacht.chat with your domain)
    4. Set up the following GitHub secrets.
    • HOST -> Server domain where you want to host Yacht.Chat
    • USERNAME -> User name of a user who has access to the Server
    • KEY -> ssh key for the USERNAME
    • SPACES_DB_PASSWORD -> Password for spaces database
    • KEYCLOAK_PASSWORD -> Password for Keycloak
    • KEYCLOAK_DB_PASSWORD -> Password for Keycloak database
    • KEYCLOAK_ACCOUNTSERVICE_PASSWORD -> Password for Keycloak Account service
    • KEYCLOAK_CLIENT_SECRET_ACCOUNT_SERVICE -> Client Secret for Keycloak Account service
    • KEYCLOAK_PASSWORD -> Password for Keycloak
    • KEYCLOAK_CLIENT_SECRET -> Client Secret for Keycloak
    • SPACES_JWT_SECRET -> Spaces JWT Secret
    1. Go to Actions and run the GitHub workflow ‘init_server’
    Visit original content creator repository https://github.com/YachtChat/YachtChat
  • clipboard-toastr-rails

    clipboard-toastr-rails

    Gem Version Code Climate

    Build Status GitHub issues Dependency Status Coverage Status

    GitHub license

    clipboard-toastr-rails gem is the integration of clipboard.js and toastr javascript library(using 2.2 Version) for your Rails 4, 5 application.

    Ruby gems url: https://rubygems.org/gems/clipboard-toastr-rails

    Installation

    Add this line to your application’s Gemfile:

    gem 'clipboard-toastr-rails'

    And then execute:

    $ bundle
    

    Or install it yourself as:

    $ gem install clipboard-toastr-rails
    

    Now you need to edit your app/assets/javascripts/application.js file and add the following line:

    //= require clipboard-toastr

    And you need to edit your app/assets/stylesheets/application.css file and add the following line:

    *= require toastr

    If Use app/assets/stylesheets/application.scss file

    @import "toastr";

    Usage

    Here is the example working code to test with your Rails application.

    Add this sample code to your app/assets/javascripts/application.js file

    $(document).ready(function(){
    
      clip = new Clipboard('.copy-target')
    
      toastr.options = {
        "positionClass": "toast-bottom-center",
        ....
        ....
      }
    
      $(".copy-target").click(function() {
        toastr.info "Copy Success Alert"
      });
    
      target_clip = new Clipboard('.copy-target1')
    
      toastr.options = {
        "positionClass": "toast-top-center",
        ....
        ....
      }
    
      $(".copy-target1").click(function() {
        toastr.info "Copy Success Alert"
      });


    });
    <html>
      <head>
      ...
      </head>
    
      <body>
        ...
        ...
    
        <input id="copy-content" value="This is Copy Content"/>
    
        <span class="copy-target1" data-clipboard-target="#copy-content">Copy This Content</span>
    
        ...
        ...
    
        <span class="copy-target" data-clipboard-text="COPY CONTENT">Copy Link</span>
    
        ...
        ...
      </body>
    
    </html>

    Full documentation

    The Documentation is at

    Clipboard.js Document

    Toastr Document

    Change Log

    Current Version 1.3.0

    This link listing Change Log

    Contributing

    1. Fork it
    2. Create your feature branch (git checkout -b my-new-feature)
    3. Commit your changes (git commit -am 'Added some feature')
    4. Push to the branch (git push origin my-new-feature)
    5. Create new Pull Request

    License

    The gem is available as open source under the terms of the MIT License.

    Visit original content creator repository https://github.com/ggomagundan/clipboard-toastr-rails
  • elm-firestore

    elm-firestore

    GitHub Actions Workflow Status Elm package

    A type-safe Firestore integration module for Elm. No JavaScript/TypeScript needed for ports.

    The features elm-firestore library supports are as follows:

    Feature Supported?
    Simple CRUD operation (get, list, create, patch, delete) ✅ Yes
    Transactions ✅ Yes
    Collection group ✅ Yes
    Query Partially supported
    Realtime update listening ❗ No

    When will this package support realtime update?

    Realtime update listening is one of fundamental features Firestore offers, but this library internally uses Firestore RESTful API which is officially said to be out of support for realtime update.

    I strongly recommend you to use Firestore SDK in JavaScript through Ports instead of this library if you have a strong need to use realtime update on Firestore. This library shall not support it unless Google changes their mind.

    Example

    Almost all basic types in Firestore are supported

    import Firestore
    import Firestore.Config as Config
    import Firestore.Decode as FSDecode
    import Firestore.Types.Geopoint as Geopoint
    import Firestore.Types.Reference as Reference
    import Result.Extra as ExResult
    
    
    -- model
    
    
    type alias Model =
        { firestore : Firestore.Firestore
        , document : Maybe (Firestore.Document Document)
        }
    
    
    type alias Document =
        { timestamp : Time.Posix
        , geopoint : Geopoint.Geopoint
        , reference : Reference.Reference
        , integer : Int
        , string : String
        , list : List String
        , map : Dict.Dict String String
        , boolean : Bool
        , nullable : Maybe String
        }


    -- init
    
    
    init : ( Model, Cmd Msg )
    init =
        let
            firestore =
                Config.new
                    { apiKey = "your-own-api-key"
                    , project = "your-firestore-app"
                    }
                    |> Config.withDatabase "your-own-database" -- optional
                    |> Config.withAuthorization "your-own-auth-token" -- optional
                    |> Firestore.init
        in
        ( { firestore = firestore, document = Nothing }
        , firestore
            |> Firestore.root
            |> Firestore.collection "users"
            |> Firestore.document "user1"
            |> Firestore.build
            |> ExResult.toTask
            |> Task.andThen (Firestore.get decoder)
            |> Task.attempt GotDocument
        )
    
    
    decoder : FSDecode.Decoder Document
    decoder =
        FSDecode.document Document
            |> FSDecode.required "timestamp" FSDecode.timestamp
            |> FSDecode.required "geopoint" FSDecode.geopoint
            |> FSDecode.required "reference" FSDecode.reference
            |> FSDecode.required "integer" FSDecode.int
            |> FSDecode.required "string" FSDecode.string
            |> FSDecode.required "list" (FSDecode.list FSDecode.string)
            |> FSDecode.required "map" (FSDecode.dict FSDecode.string)
            |> FSDecode.required "boolean" FSDecode.bool
            |> FSDecode.required "nullable" (FSDecode.maybe FSDecode.string)
    
    
    encoder : Document -> FSEncode.Encoder
    encoder doc =
        FSEncode.new
            |> FSEncode.field "timestamp" (FSEncode.timestamp doc.timestamp)
            |> FSEncode.field "geopoint" (FSEncode.geopoint doc.geopoint)
            |> FSEncode.field "reference" (FSEncode.reference doc.reference)
            |> FSEncode.field "integer" (FSEncode.int doc.integer)
            |> FSEncode.field "string" (FSEncode.string doc.string)
            |> FSEncode.field "list" (FSEncode.list FSEncode.string doc.list)
            |> FSEncode.field "map" (FSEncode.dict FSEncode.string doc.map)
            |> FSEncode.field "boolean" (FSEncode.bool doc.boolean)
            |> FSEncode.build


    -- update
    
    
    type Msg
        = GotDocument (Result Firestore.Error (Firestore.Document Document))
        | SaveDocument Document
    
    
    update : Msg -> Model -> ( Model, Cmd msg )
    update msg model =
        case msg of
            SaveDocument doc ->
                ( model
                , model.firestore
                    |> Firestore.root
                    |> Firestore.collection "users"
                    |> Firestore.document "user1"
                    |> Firestore.build
                    |> ExResult.toTask
                    |> ExResult.toTask
                    |> Task.andThen (Firestore.insert decoder (encoder doc))
                    |> Task.attempt GotDocument
                )
    
            GotDocument result ->
                case result of
                    Ok document ->
                        ( { model | document = Just document }, Cmd.none )
    
                    Err (Firestore.Http_ httpErr) ->
                        -- ...
    
                    Err (Firestore.Response firestoreErr) ->
                        -- ...

    Development

    Setup

    Install pnpm to setup elm-firestore development

    $ pnpm install

    Build

    $ pnpm build

    Unit testing

    $ pnpm test

    Integration testing

    This requires you to install Open JDK to run Firestore Emulator.

    $ pnpm test:integration:setup
    $ pnpm test:integration

    License

    MIT

    Contribution

    PRs accepted

    Visit original content creator repository https://github.com/IzumiSy/elm-firestore