        Linux kernel release 3.x <http://kernel.org/>

These are the release notes for Linux version 3.  Read them carefully,
as they tell you what this is all about, explain how to install the
kernel, and what to do if something goes wrong.

WHAT IS LINUX?

  Linux is a clone of the operating system Unix, written from scratch by
  Linus Torvalds with assistance from a loosely-knit team of hackers across
  the Net. It aims towards POSIX and Single UNIX Specification compliance.

  It has all the features you would expect in a modern fully-fledged Unix,
  including true multitasking, virtual memory, shared libraries, demand
  loading, shared copy-on-write executables, proper memory management,
  and multistack networking including IPv4 and IPv6.

  It is distributed under the GNU General Public License - see the
  accompanying COPYING file for more details.

ON WHAT HARDWARE DOES IT RUN?

  Although originally developed first for 32-bit x86-based PCs (386 or higher),
  today Linux also runs on (at least) the Compaq Alpha AXP, Sun SPARC and
  UltraSPARC, Motorola 68000, PowerPC, PowerPC64, ARM, Hitachi SuperH, Cell,
  IBM S/390, MIPS, HP PA-RISC, Intel IA-64, DEC VAX, AMD x86-64, AXIS CRIS,
  Xtensa, Tilera TILE, AVR32 and Renesas M32R architectures.

  Linux is easily portable to most general-purpose 32- or 64-bit architectures
  as long as they have a paged memory management unit (PMMU) and a port of the
  GNU C compiler (gcc) (part of The GNU Compiler Collection, GCC). Linux has
  also been ported to a number of architectures without a PMMU, although
  functionality is then obviously somewhat limited.
  Linux has also been ported to itself. You can now run the kernel as a
  userspace application - this is called UserMode Linux (UML).

DOCUMENTATION:

 - There is a lot of documentation available both in electronic form on
   the Internet and in books, both Linux-specific and pertaining to
   general UNIX questions.  I'd recommend looking into the documentation
   subdirectories on any Linux FTP site for the LDP (Linux Documentation
   Project) books.  This README is not meant to be documentation on the
   system: there are much better sources available.

 - There are various README files in the Documentation/ subdirectory:
   these typically contain kernel-specific installation notes for some
   drivers for example. See Documentation/00-INDEX for a list of what
   is contained in each file.  Please read the Changes file, as it
   contains information about the problems, which may result by upgrading
   your kernel.

 - The Documentation/DocBook/ subdirectory contains several guides for
   kernel developers and users.  These guides can be rendered in a
   number of formats:  PostScript (.ps), PDF, HTML, & man-pages, among others.
   After installation, "make psdocs", "make pdfdocs", "make htmldocs",
   or "make mandocs" will render the documentation in the requested format.

INSTALLING the kernel source:

 - If you install the full sources, put the kernel tarball in a
   directory where you have permissions (eg. your home directory) and
   unpack it:

     gzip -cd linux-3.X.tar.gz | tar xvf -

   or

     bzip2 -dc linux-3.X.tar.bz2 | tar xvf -

   Replace "X" with the version number of the latest kernel.

   Do NOT use the /usr/src/linux area! This area has a (usually
   incomplete) set of kernel headers that are used by the library header
   files.  They should match the library, and not get messed up by
   whatever the kernel-du-jour happens to be.

 - You can also upgrade between 3.x releases by patching.  Patches are
   distributed in the traditional gzip and the newer bzip2 format.  To
   install by patching, get all the newer patch files, enter the
   top level directory of the kernel source (linux-3.X) and execute:

     gzip -cd ../patch-3.x.gz | patch -p1

   or

     bzip2 -dc ../patch-3.x.bz2 | patch -p1

   Replace "x" for all versions bigger than the version "X" of your current
   source tree, _in_order_, and you should be ok.  You may want to remove
   the backup files (some-file-name~ or some-file-name.orig), and make sure
   that there are no failed patches (some-file-name# or some-file-name.rej).
   If there are, either you or I have made a mistake.

   Unlike patches for the 3.x kernels, patches for the 3.x.y kernels
   (also known as the -stable kernels) are not incremental but instead apply
   directly to the base 3.x kernel.  For example, if your base kernel is 3.0
   and you want to apply the 3.0.3 patch, you must not first apply the 3.0.1
   and 3.0.2 patches. Similarly, if you are running kernel version 3.0.2 and
   want to jump to 3.0.3, you must first reverse the 3.0.2 patch (that is,
   patch -R) _before_ applying the 3.0.3 patch. You can read more on this in
   Documentation/applying-patches.txt

   Alternatively, the script patch-kernel can be used to automate this
   process.  It determines the current kernel version and applies any
   patches found.

     linux/scripts/patch-kernel linux

   The first argument in the command above is the location of the
   kernel source.  Patches are applied from the current directory, but
   an alternative directory can be specified as the second argument.

 - Make sure you have no stale .o files and dependencies lying around:

     cd linux
     make mrproper

   You should now have the sources correctly installed.

SOFTWARE REQUIREMENTS

   Compiling and running the 3.x kernels requires up-to-date
   versions of various software packages.  Consult
   Documentation/Changes for the minimum version numbers required
   and how to get updates for these packages.  Beware that using
   excessively old versions of these packages can cause indirect
   errors that are very difficult to track down, so don't assume that
   you can just update packages when obvious problems arise during
   build or operation.

BUILD directory for the kernel:

   When compiling the kernel, all output files will per default be
   stored together with the kernel source code.
   Using the option "make O=output/dir" allow you to specify an alternate
   place for the output files (including .config).
   Example:

     kernel source code: /usr/src/linux-3.X
     build directory:    /home/name/build/kernel

   To configure and build the kernel, use:

     cd /usr/src/linux-3.X
     make O=/home/name/build/kernel menuconfig
     make O=/home/name/build/kernel
     sudo make O=/home/name/build/kernel modules_install install

   Please note: If the 'O=output/dir' option is used, then it must be
   used for all invocations of make.

CONFIGURING the kernel:

   Do not skip this step even if you are only upgrading one minor
   version.  New configuration options are added in each release, and
   odd problems will turn up if the configuration files are not set up
   as expected.  If you want to carry your existing configuration to a
   new version with minimal work, use "make oldconfig", which will
   only ask you for the answers to new questions.

 - Alternative configuration commands are:

     "make config"      Plain text interface.

     "make menuconfig"  Text based color menus, radiolists & dialogs.

     "make nconfig"     Enhanced text based color menus.

     "make xconfig"     X windows (Qt) based configuration tool.

     "make gconfig"     X windows (Gtk) based configuration tool.

     "make oldconfig"   Default all questions based on the contents of
                        your existing ./.config file and asking about
                        new config symbols.

     "make silentoldconfig"
                        Like above, but avoids cluttering the screen
                        with questions already answered.
                        Additionally updates the dependencies.

     "make olddefconfig"
                        Like above, but sets new symbols to their default
                        values without prompting.

     "make defconfig"   Create a ./.config file by using the default
                        symbol values from either arch/$ARCH/defconfig
                        or arch/$ARCH/configs/${PLATFORM}_defconfig,
                        depending on the architecture.

     "make ${PLATFORM}_defconfig"
                        Create a ./.config file by using the default
                        symbol values from
                        arch/$ARCH/configs/${PLATFORM}_defconfig.
                        Use "make help" to get a list of all available
                        platforms of your architecture.

     "make allyesconfig"
                        Create a ./.config file by setting symbol
                        values to 'y' as much as possible.

     "make allmodconfig"
                        Create a ./.config file by setting symbol
                        values to 'm' as much as possible.

     "make allnoconfig" Create a ./.config file by setting symbol
                        values to 'n' as much as possible.

     "make randconfig"  Create a ./.config file by setting symbol
                        values to random values.

     "make localmodconfig" Create a config based on current config and
                           loaded modules (lsmod). Disables any module
                           option that is not needed for the loaded modules.

                           To create a localmodconfig for another machine,
                           store the lsmod of that machine into a file
                           and pass it in as a LSMOD parameter.

                   target$ lsmod > /tmp/mylsmod
                   target$ scp /tmp/mylsmod host:/tmp

                   host$ make LSMOD=/tmp/mylsmod localmodconfig

                           The above also works when cross compiling.

     "make localyesconfig" Similar to localmodconfig, except it will convert
                           all module options to built in (=y) options.

   You can find more information on using the Linux kernel config tools
   in Documentation/kbuild/kconfig.txt.

 - NOTES on "make config":

    - Having unnecessary drivers will make the kernel bigger, and can
      under some circumstances lead to problems: probing for a
      nonexistent controller card may confuse your other controllers

    - Compiling the kernel with "Processor type" set higher than 386
      will result in a kernel that does NOT work on a 386.  The
      kernel will detect this on bootup, and give up.

    - A kernel with math-emulation compiled in will still use the
      coprocessor if one is present: the math emulation will just
      never get used in that case.  The kernel will be slightly larger,
      but will work on different machines regardless of whether they
      have a math coprocessor or not.

    - The "kernel hacking" configuration details usually result in a
      bigger or slower kernel (or both), and can even make the kernel
      less stable by configuring some routines to actively try to
      break bad code to find kernel problems (kmalloc()).  Thus you
      should probably answer 'n' to the questions for "development",
      "experimental", or "debugging" features.

COMPILING the kernel:

 - Make sure you have at least gcc 3.2 available.
   For more information, refer to Documentation/Changes.

   Please note that you can still run a.out user programs with this kernel.

 - Do a "make" to create a compressed kernel image. It is also
   possible to do "make install" if you have lilo installed to suit the
   kernel makefiles, but you may want to check your particular lilo setup first.

   To do the actual install, you have to be root, but none of the normal
   build should require that. Don't take the name of root in vain.

 - If you configured any of the parts of the kernel as `modules', you
   will also have to do "make modules_install".

 - Verbose kernel compile/build output:

   Normally, the kernel build system runs in a fairly quiet mode (but not
   totally silent).  However, sometimes you or other kernel developers need
   to see compile, link, or other commands exactly as they are executed.
   For this, use "verbose" build mode.  This is done by inserting
   "V=1" in the "make" command.  E.g.:

     make V=1 all

   To have the build system also tell the reason for the rebuild of each
   target, use "V=2".  The default is "V=0".

 - Keep a backup kernel handy in case something goes wrong.  This is
   especially true for the development releases, since each new release
   contains new code which has not been debugged.  Make sure you keep a
   backup of the modules corresponding to that kernel, as well.  If you
   are installing a new kernel with the same version number as your
   working kernel, make a backup of your modules directory before you
   do a "make modules_install".

   Alternatively, before compiling, use the kernel config option
   "LOCALVERSION" to append a unique suffix to the regular kernel version.
   LOCALVERSION can be set in the "General Setup" menu.

 - In order to boot your new kernel, you'll need to copy the kernel
   image (e.g. .../linux/arch/i386/boot/bzImage after compilation)
   to the place where your regular bootable kernel is found.

 - Booting a kernel directly from a floppy without the assistance of a
   bootloader such as LILO, is no longer supported.

   If you boot Linux from the hard drive, chances are you use LILO, which
   uses the kernel image as specified in the file /etc/lilo.conf.  The
   kernel image file is usually /vmlinuz, /boot/vmlinuz, /bzImage or
   /boot/bzImage.  To use the new kernel, save a copy of the old image
   and copy the new image over the old one.  Then, you MUST RERUN LILO
   to update the loading map!! If you don't, you won't be able to boot
   the new kernel image.

   Reinstalling LILO is usually a matter of running /sbin/lilo.
   You may wish to edit /etc/lilo.conf to specify an entry for your
   old kernel image (say, /vmlinux.old) in case the new one does not
   work.  See the LILO docs for more information.

   After reinstalling LILO, you should be all set.  Shutdown the system,
   reboot, and enjoy!

   If you ever need to change the default root device, video mode,
   ramdisk size, etc.  in the kernel image, use the 'rdev' program (or
   alternatively the LILO boot options when appropriate).  No need to
   recompile the kernel to change these parameters.

 - Reboot with the new kernel and enjoy.

IF SOMETHING GOES WRONG:

 - If you have problems that seem to be due to kernel bugs, please check
   the file MAINTAINERS to see if there is a particular person associated
   with the part of the kernel that you are having trouble with. If there
   isn't anyone listed there, then the second best thing is to mail
   them to me (torvalds@linux-foundation.org), and possibly to any other
   relevant mailing-list or to the newsgroup.

 - In all bug-reports, *please* tell what kernel you are talking about,
   how to duplicate the problem, and what your setup is (use your common
   sense).  If the problem is new, tell me so, and if the problem is
   old, please try to tell me when you first noticed it.

 - If the bug results in a message like

     unable to handle kernel paging request at address C0000010
     Oops: 0002
     EIP:   0010:XXXXXXXX
     eax: xxxxxxxx   ebx: xxxxxxxx   ecx: xxxxxxxx   edx: xxxxxxxx
     esi: xxxxxxxx   edi: xxxxxxxx   ebp: xxxxxxxx
     ds: xxxx  es: xxxx  fs: xxxx  gs: xxxx
     Pid: xx, process nr: xx
     xx xx xx xx xx xx xx xx xx xx

   or similar kernel debugging information on your screen or in your
   system log, please duplicate it *exactly*.  The dump may look
   incomprehensible to you, but it does contain information that may
   help debugging the problem.  The text above the dump is also
   important: it tells something about why the kernel dumped code (in
   the above example, it's due to a bad kernel pointer). More information
   on making sense of the dump is in Documentation/oops-tracing.txt

 - If you compiled the kernel with CONFIG_KALLSYMS you can send the dump
   as is, otherwise you will have to use the "ksymoops" program to make
   sense of the dump (but compiling with CONFIG_KALLSYMS is usually preferred).
   This utility can be downloaded from
   ftp://ftp.<country>.kernel.org/pub/linux/utils/kernel/ksymoops/ .
   Alternatively, you can do the dump lookup by hand:

 - In debugging dumps like the above, it helps enormously if you can
   look up what the EIP value means.  The hex value as such doesn't help
   me or anybody else very much: it will depend on your particular
   kernel setup.  What you should do is take the hex value from the EIP
   line (ignore the "0010:"), and look it up in the kernel namelist to
   see which kernel function contains the offending address.

   To find out the kernel function name, you'll need to find the system
   binary associated with the kernel that exhibited the symptom.  This is
   the file 'linux/vmlinux'.  To extract the namelist and match it against
   the EIP from the kernel crash, do:

     nm vmlinux | sort | less

   This will give you a list of kernel addresses sorted in ascending
   order, from which it is simple to find the function that contains the
   offending address.  Note that the address given by the kernel
   debugging messages will not necessarily match exactly with the
   function addresses (in fact, that is very unlikely), so you can't
   just 'grep' the list: the list will, however, give you the starting
   point of each kernel function, so by looking for the function that
   has a starting address lower than the one you are searching for but
   is followed by a function with a higher address you will find the one
   you want.  In fact, it may be a good idea to include a bit of
   "context" in your problem report, giving a few lines around the
   interesting one.

   If you for some reason cannot do the above (you have a pre-compiled
   kernel image or similar), telling me as much about your setup as
   possible will help.  Please read the REPORTING-BUGS document for details.

 - Alternatively, you can use gdb on a running kernel. (read-only; i.e. you
   cannot change values or set break points.) To do this, first compile the
   kernel with -g; edit arch/i386/Makefile appropriately, then do a "make
   clean". You'll also need to enable CONFIG_PROC_FS (via "make config").

   After you've rebooted with the new kernel, do "gdb vmlinux /proc/kcore".
   You can now use all the usual gdb commands. The command to look up the
   point where your system crashed is "l *0xXXXXXXXX". (Replace the XXXes
   with the EIP value.)

   gdb'ing a non-running kernel currently fails because gdb (wrongly)
   disregards the starting offset for which the kernel is compiled.

I’ve been updating this readme as i experiment and make changes to the code, which could include changes to the actual neural network. This means that trying to reproduce these results now by using the parameters i used might not give the same results, because the network is likely different now from when i ran the training session that produced the result given in the readme. Looking at the version control history of this readme, and checking out the commit that the result was added in should work.
This project is about training deepRL agents at varius tasks made with pygame. Currently using an A3C agent.

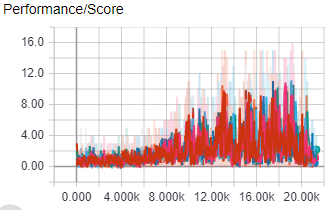
The above image shows score per episode for 8 workers during their 1 day and 20 hour training session in the A3Cbootcamp game level FeedingGrounds, a game where the agent has to “eat food” by moving to the green squares, the agent controls a blue square inside a square environment.
The agent was trained using a i7 6700k and a GTX 1080 ti

The above gif shows a sequence of the game, the way the agent sees it.


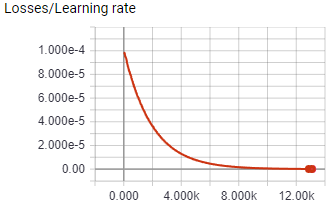
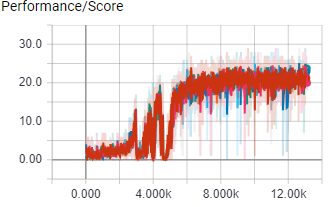
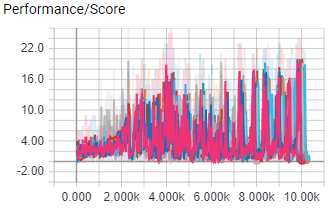
The above images shows the score and learning rate per episode of 8 A3C worker agents during their almost 18 hour training session in the ShootingGrounds level of A3CBootcamp. The agents control a blue square with the ability to shoot, and it has to shoot the read squares. Shooting a red square rewards the agent with 1 point. The agent needs to shoot as many red squares as possible within the time limit to get the most points.
Youtube video of agent progress in ShootingGrounds: https://www.youtube.com/watch?v=fEKITU7cjNg&feature=youtu.be
Causality tracking is a system in this project that tries to solve the credit assignment problem. Causality tracking assigns rewards to the (action, state) tuple that caused the reward. In practice this means that the game keeps track of at which time step all bullets are fired, and when a bullet hits something, the reward is credited to the (action, state) tuple from which the bullet was fired instead of the most current (action, state) tuple.
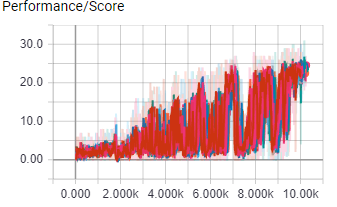
This causality tracking test was done in the ShootingGrounds game.

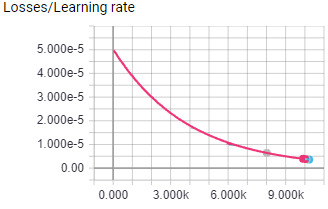
The above image shows the learning rate for both test. Both test were run for 10K episodes with 16 worker agents, all hyper parameters were the same.


With causality tracking disabled, the agent performance peaked at 20 points, with causality tracking enabled performance peaked at 25 points.
This means that for this experiment causality tracking improved perfomance by 25%


