I’ve been updating this readme as i experiment and make changes to the code, which could include changes to the actual neural network. This means that trying to reproduce these results now by using the parameters i used might not give the same results, because the network is likely different now from when i ran the training session that produced the result given in the readme. Looking at the version control history of this readme, and checking out the commit that the result was added in should work.
PygameDeepRLAgent
This project is about training deepRL agents at varius tasks made with pygame. Currently using an A3C agent.
Results
FeedingGrounds
The above image shows score per episode for 8 workers during their 1 day and 20 hour training session in the A3Cbootcamp game level FeedingGrounds, a game where the agent has to “eat food” by moving to the green squares, the agent controls a blue square inside a square environment.
The agent was trained using a i7 6700k and a GTX 1080 ti
The above gif shows a sequence of the game, the way the agent sees it.
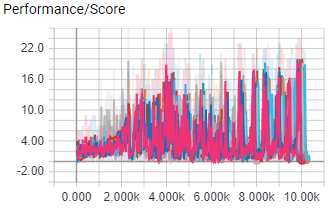
ShootingGrounds
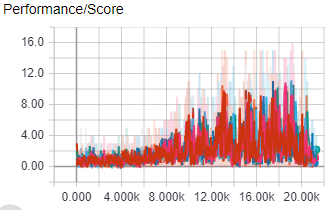
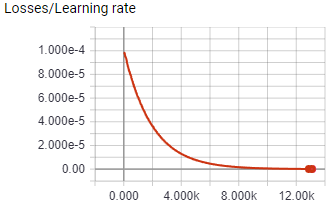
The above images shows the score and learning rate per episode of 8 A3C worker agents during their almost 18 hour training session in the ShootingGrounds level of A3CBootcamp. The agents control a blue square with the ability to shoot, and it has to shoot the read squares. Shooting a red square rewards the agent with 1 point. The agent needs to shoot as many red squares as possible within the time limit to get the most points.
Causality tracking is a system in this project that tries to solve the credit assignment problem. Causality tracking assigns rewards to the (action, state) tuple that caused the reward. In practice this means that the game keeps track of at which time step all bullets are fired, and when a bullet hits something, the reward is credited to the (action, state) tuple from which the bullet was fired instead of the most current (action, state) tuple.
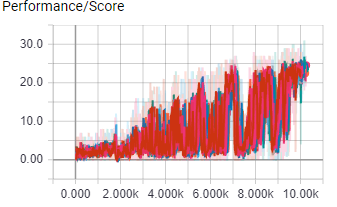
Test
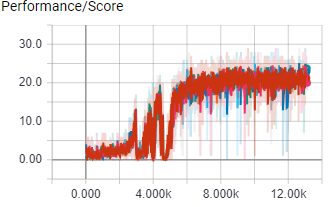
This causality tracking test was done in the ShootingGrounds game.
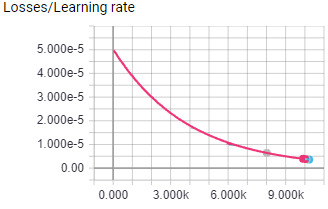
The above image shows the learning rate for both test.
Both test were run for 10K episodes with 16 worker agents, all hyper parameters were the same.
Causality tracking disabled
Causality tracking enabled
Result
With causality tracking disabled, the agent performance peaked at 20 points, with causality tracking enabled performance peaked at 25 points.
This means that for this experiment causality tracking improved perfomance by 25%
Para entender o código do exercício 2 tenho que saber:
O que está na theList – tabuleiro do campo minado
Para que serve a posição 0 da lista – valor do status de uma célula no tabuleiro
O que significa o valor 4 – diz se a célula está marcada com uma bandeirinha
Para que eu usaria a lista retornada – obter a lista de células que estão marcadas com a bandeirinha, para verificar se o jogador já marcou todas as bombas e ganhou, por exemplo
Contexto implícito dificulta o entendimento do código
Nomes pronunciáveis são importantes para facilitar a comunicação.
Se pessoas novas precisam pedir para explicar o significado dos nomes é um forte indício que são nomes de baixa qualidade, seria mais simples e barato usar palavras que já existem na língua
“Codificar informações do escopo ou tipos em nomes simplesmente adiciona uma tarefa extra de decodificação… É uma sobrecarga mental desnecessária ao tentar resolver um problema.”
Evite o mapeamento mental
Evitar que as pessoas tenham que fazer traduções mentais de nomes escolhidos para os conhecidos.
Usar termo de domínio do problema e da solução.
“Clareza é fundamental. Os profissionais usam seus poderes para o bem e escrevem códigos que outros possam entender.”
Nomes de classes
Classes e objetos devem ter nomes com substantivo(s), evitar palavras que podem ser tanto substantivo quanto verbo, exemplo: Manager.
Nomes de métodos
Devem ser verbos.
Padrão javabean get, set e is + valor
Usar factory methods estáticos com nomes que descrevem os pârametros quando os construtores da classe estiverem sobrecarregados. Para forçar o uso da factory deixar os contrutores correspondentes como privados.
Complex fulcrumPoint = Complex.FromRealNumber(23.0);

// Melhor que:

Complex fulcrumPoint = new Complex(23.0);
This website helps people find their account balance at any date and time. The user simply enters the address and date he wants to search for, the website will then perform a binary search through the blockchain looking for the block with the timestamp closest to the target date and time. It currently only works for the Polkadot network, however there are plans to expand the website to other networks like Kusama.
📏 Techs used in the project
The website was built using React.js with Chakra UI, Polkadot API and react-datepicker. Chakra UI and React were chosen because of my familiarity with such tools, which enabled me to build the initial version of the site in a few hours.
How it works
When I got the idea to do this project, the first Google search I did was “how to find Polkadot blocks by date”. The research ended up showing me that this was not possible in an easy way and hardly something like this would be implemented since there were block indexers that already provided this feature.
The indexers I found did not serve me the way I would like and I came up with the idea of fetching the block manually. Assuming that we can see the timestamp of all blocks in the chain, I decided to implement a binary search to find the block closest to a timestamp. The use of binary search slightly impairs the speed of response for searches, since it will have to consult timestamps of several blocks until it finds the target block. However, it is a simple and straightforward solution.
Roadmap
The website is still extremely simple, there are many improvements to be made, such as: error validation, UX improvements, possibility of consultation on other networks and so on. Such features will be implemented soon.
Buy me a coffee
If you found the project interesting or were helped by the website, you can buy me a coffee. Just send me your tip in DOT to the following address: 12ENWcCZ6PsMPMULpYNhoevt2cVQypcR7sBEujzQJovJVdg8
Microsphere Java Framework is a foundational library that serves as the backbone
for MicroSphere ecosystem. It provides a rich set of reusable components,
utilities, and annotation processing capabilities that address common challenges in Java development. Whether you’re
building enterprise applications, microservices, or standalone Java tools, this framework offers the building blocks you
need to accelerate development and maintain consistency across your projects.
The framework is designed with modularity at its core, allowing you to use only the components you need while keeping
your application lightweight and efficient. It’s built on standard Java APIs and integrates seamlessly with popular
frameworks like Spring, making it a versatile addition to any Java developer’s toolkit.
Features
Core Utilities
I/O
Collection manipulation
Class loading
Concurrency
Reflection
Networking
Artifact management
Event Sourcing
JMX
Versioning
Annotation processing
Modules
The framework is organized into several key modules:
Module
Purpose
microsphere-java-core
Provides core utilities across various domains like annotations, collections, concurrency, etc.
microsphere-annotation-processor
Offers annotation processing capabilities for compile-time code generation
microsphere-java-dependencies
Manages dependency versions across the project
microsphere-java-parent
Parent POM with shared configurations
Getting Started
The easiest way to get started is by adding the Microsphere Java BOM (Bill of Materials) to your project’s pom.xml:
Under the hood, all calculations are done by the immutable and thread-safe Percentage class. You can always query for
the percentage’s original value, and its decimal representation (i.e., its value divided by 100):
val percentage =5.5.percent()
percentage.decimal // 0.055
percentage.value // 5.5
Rounding
If you need to round the resulting calculations using a Percentage, just pass an instance of the Rounding class to
the percent() method. Use the Rounding.to() factory method to create the object, passing the number of decimal
places and the desired rounding mode:
val percentage =11.603773.percent()
val roundsFloor =11.603773.percent(Rounding.to(2, RoundingMode.FLOOR))
val value =127
value * percentage // 14.73679171
value * roundsFloor // 14.73
The rounding mode to use is defined by one of RoundingMode enum values. If you need to use HALF_EVEN, just pass the
number of desired decimal places:
val roundsHalfUp =11.603773.percent(2)
value * roundsHalfUp // 14.74
Other utilities
Create a Percentage based on a ratio
To create a Percentage based on a ratio (e.g. 1/2, 1/3, 1/4, and so on), use the ratioOf() function:
1 ratioOf 4// 25%1 ratioOf 3// 33.33%
The function also has overloaded versions to control the rounding strategy of the returned Percentage object:
// rounds using 2 decimal places and with RoundingMode.HALF_EVEN1.ratioOf(3, 2)
// rounds using 2 decimal places and with RoundingMode.UP1.ratioOf(3, Rounding.to(2, RoundingMode.UP))
Calculate the relative change as a Percentage for two numbers
To calculate the relative change between two numbers, use the relativeChange() function:
The function also has overloaded versions to control the rounding strategy of the returned Percentage object:
// rounds using 2 decimal places and with RoundingMode.HALF_EVEN3.relativeChange(1, 2)
// rounds using 2 decimal places and with RoundingMode.UP3.relativeChange(1, Rounding.to(2, RoundingMode.UP))
Calculate the base value of a number when it’s a given Percentage
To calculate the base value of a number when it’s a given Percentage, use the valueWhen() function:
5 valueWhen 20.percent() // 25.0
In other words, the function helps to answer the question “5 is 20% of what number?”
Code examples
The UsageExamples file has more
examples of calculations using the Percentage library.
임시 데이터를 생성하기 이전에 MongoDB에서의 auto increment를 위해 위 함수를 선언해 주시길 바랍니다.
auto increment가 작동하는 방식이라면, 꼭 위의 함수를 사용하지 않아도 됩니다.
Insert BBS Temp Data
>db.bbs.insertMany([{idx:autoInc("bbs"),title:"This is temp Title _ 0",author:"kyechan",date:newDate()},{idx:autoInc("bbs"),title:"This is temp Title _ 1",author:"John",date:newDate()},{idx:autoInc("bbs"),title:"This is temp Title _ 2",author:"Andrew",date:newDate()},{idx:autoInc("bbs"),title:"This is temp Title _ 3",author:"Henry",date:newDate()},{idx:autoInc("bbs"),title:"This is temp Title _ 4",author:"Park",date:newDate()},{idx:autoInc("bbs"),title:"This is temp Title _ 5",author:"Kim K",date:newDate()},{idx:autoInc("bbs"),title:"This is temp Title _ 6",author:"Park",date:newDate()},{idx:autoInc("bbs"),title:"This is temp Title _ 7",author:"Yahn",date:newDate()},{idx:autoInc("bbs"),title:"This is temp Title _ 8",author:"kyechan",date:newDate()},{idx:autoInc("bbs"),title:"This is temp Title _ 9",author:"Kang",date:newDate()},{idx:autoInc("bbs"),title:"This is temp Title _ 10",author:"Henry",date:newDate()},{idx:autoInc("bbs"),title:"This is temp Title _ 11",author:"Andrew",date:newDate()}])
임시 데이터들입니다.
If you need more temp data -> moreTempData
npm install -g @eriicafes/reflow # global

npm install @eriicafes/reflow #local
And initialise:
reflow init
With a global installation you will not be required to use npx. Global installation is preferred as reflow still requires a local installation and will always run the locally installed binary when available.
Usage/Examples
Examples below assume you have both a global installation and a local installation, for local installation only you will have to prefix the command with npx
All commands have a -h or --help flag to display a help message.
Nearly all commands have a -d or --dry-run flag useful to see the commands that would run without actually making any changes.
Command arguments in square brackets [] are optional while those in angle brackets <> are required.
Initialise reflow workspace
reflow init

Options:
  -n --no-install  turn off automatic package installation
  --lib            initialize as an npm library
Branching
create and checkout new branch
reflow branch [name] [parent]
rename the current branch
reflow branch -r [name]
Checkout
reflow checkout [branch]
checkout with search on branches (this examples searches for all branches beginning with feat)
reflow checkout feat
Merge
merge branch to the main branch (whether on the main branch or on the branch to be merged)
reflow commit

Options:
  --retry     retry last commit attempt
Push
push branch to remote (prompts to sets upstream if not available)
force push is a bit less dangerous as the following flags are attached -f --force-with-lease --force-if-includes
reflow push

Options:
  -f --force  force push
Release
make a release (bump version, tag commit and push changes)
would usually only be run on a CI/CD pipeline except if -f or --force flag is used
reflow release

Options:
  -f --force      force release when not in a CI environment (default: false)
  -a --as <type>  release with a specific version type
  --no-push       prevent pushing changes and tags to remote
NOTE: For projects that started with a major version at zero (0.y.z) you may need some manual action to bump the major version to 1.0.0. Once the project is ready for the first major release, run the command below from the main branch:
reflow release --as major -f
Prerelease
make a pre-release (eg. v1.0.1-{tag}.0)
reflow prerelease

Options:
  -t --tag <name>  pre-release tag
  --as <type>      release with a specific version type
  --no-push        prevent pushing changes and tags to remote
for example if version is at 0.1.0 and we want to make a prerelease with an alpha tag and release as a a minor version:
reflow prerelease -t alpha --as minor
this will bump the version from 0.1.0 to 0.2.0-alpha.0
Generate Files
type includes configs, actions and hooks, file is the file name, run the command without any arguments to see all possible files to generate
reflow generate [type] [file]

Options:
   -c --common   generate all common template files
   -a --all      generate all template files
Actions (github actions)
When you run reflow init a test.yml workflow will be generated, which will run tests and build using npm test and npm run build respectively.
All actions are listed below:
test.yml (run tests and build)
version.yml (bump version and push new update with tags) requires a VERSION_TOKEN secret containing a Github Personal Access Token with repo permissions
release.yml (triggered by version.yml workflow, creates a draft github release)
publish.yml (triggered by release.yml workflow, publishes package to NPM) requires an NPM_TOKEN secret containing an NPM Access Token
All actions can be modified as needed
Advanced (configure reflow CLI)
For some use cases you may need to override certain defaults in the reflow config by first generating the config file using reflow generate and selecting config/reflow (which is probably the last item on the list)
Below are the defaults which you may customize as needed:
This is the VYPER version of the repository, you also can find a SOLIDITY version
This is a repository to work with and create a NFT Marketplace in a javascript environment using hardhat.
This is a backend repository, it also work with a frontend repository. However you absolutly can use this repository without the frontend part.
Summary
NFT Marketplace
The NFT Marketplace contract creates a NFT marketplace where any NFT collection can be listed or bought
Every user can withdraw the ETH from the NFT they sold.
The NFT Marketplace allow you to :
listNft: List a NFT on the marketplace with a given ETH price from any collection.
buyNft: Buy a NFT on the marketplace from any collection.
updateNftListing: Update the ETH price of your listed NFTs.
cancelNftListing: Cancel the listing of your NFT.
withdrawProceeds: Withdraw the ETH from the NFTs you sold on the Marketplace.
NFT Collections
This repository comes with 2 NFTs contract, each creating a NFT collection.
The constructor takes a mint fee in ETH and an array of token uris for each characters of the collection.
This contract implements :
Chainlink VRF to pick a random NFT when the user mint.
You can find your PRIVATE_KEY from your ethereum wallet like metamask.
To be able to fully use the NFT collections you will need an account on Pinata. It will help you to push your NFTs metadata on IPFS and create a pin for you. To use Pinata you will need an PINATA_API_KEY, a PINATA_API_SECRET and a PINATA_JWT that you can find in the developers section. Additionally use UPLOAD_TO_PINATA to push conditionally on pinata.
If you want to use it with the frontend repository, You also can clone it and set your frontend path FRONT_END_FOLDER
the UPDATE_FRONT_END set to true will update your frontend with the last deployed contract.
Finally you can add a COINMARKETCAP_API_KEY if you want to use hardhat gas reporter. You can find one by registring to CoinMarketCap Developers.
You can add your environment variables to the .env file:
You’ll also need testnet goerli ETH if you want to deploy on goerli tesnet. You can get ETH into your wallet by using the alchemy goerli faucet or chainlink faucet.
Usage
Deployment
Feel free to change the mintFee variable in the helper-hardhat-config.js for setting your mint fee for the NFT collections.
To deploy the contracts locally
yarn hardhat deploy
To deploy on goerli tesnet you need to create first a subscription on Chainlink VRF.
Add the newly created subscriptionId to your helper-hardhat-config.js.
To deploy the contracts on goerli tesnet
yarn hardhat deploy --network goerli
Once the contracts are deployed on goerli, you need to add them as a consumer to your subscription (Don’t forget to claim some LINK by using the chainlink faucet).
To update the front end repository with the newly deployed contracts (You need to pull the frontend and set your FRONT_END_FOLDER first)
Confidence makes it easier to write Java Unit tests that give you great confidence in your code with little effort.
Note
Confidence is still under development. All parts should be considered subject to change.
Declarative Testing
Declarative testing means focusing on the What instead of the How.
Any unit under test (typically a class) has two aspects:
What it is meant to do and
How you have to use it.
The How is, to a large extend, determined by the interface of a class or the signature of a function. In case of mutable classes and non-pure functions the order interactions may also be relevant. In any case though, the How is typically very static and, to some extent, also enforced by the compiler. That means we often can use the same methods for testing various implementations of the same type, we just need to provide different data and assert different behavior. That’s the What. A declarative test leaves the How to the test framework and only describes the What.
Example
The classic non-declarative test of a Predicate might look like this:
In this case we don’t see how the instance is tested, we just describe what we expect, namely that 2 satisfies the Predicate and 3 doesn’t.
All the method calls and result evaluation are performed by the satisfiedByQuality, which can be used for every Predicate implementation
Qualities
In Confidence, you use Qualitys to express what you expect of the unit under test. As seen above, Qualitys are composable to express even complex behavior.
Confidence already provides many Quality implementations, but to use its full power you should
write custom Qualitys for your own types.
Writing custom Quality implementations
Confidence already comes with a number of useful Qualitys that cover many JDK types.
Yet, it is important to be able to write custom implementations. Ideally you provide
a library with Qualitiys for all types you declare in your own code. That makes it easier for you and others (for instance users of your library) to write tests.
Composing Qualities
In many cases you can write a new Quality by composing it from already existing ones.
In fact, many of the Qualitys in the confidence-core module are just compositions of
simpler Qualitys.
Example
This is the implementation of the EmptyCharSequenceQuality, that describes CharSequences
and String with a length of 0.
This creates a new Quality composition based on an existing SatisfiesQuality.
Satisfies takes a Predicate that must be satisfied for the Quality to be satisfied and a Description of the expectation. By default, the fail Description
is the actual value, but Satisfies takes an optional argument to create a more adequate fail Description for a given actual value.
When it comes to writing tests, finding the right Quality can often feel like searching for a needle in a haystack. While some frameworks rely on fluent APIs to ease this process, Confidence takes a different approach.
Instead of a fluent API, Confidence organizes its static factory methods into classes named after the types they describe. This convention simplifies the process of discovering Qualitys, as your IDE may suggest available options simply by typing out the type you’re testing.
For example, if you’re working with an instance of Iterable (e.g. an ArrayList), you’ll find suitable Qualitys in the org.saynotobugs.confidence.core.quality.Iterable class. While this may differ from the exact naming of the type you’re testing, it ensures a logical organization that aids in discovery.
However, there are cases where a Quality doesn’t directly correlate to a specific type or serves as an adapter. Currently, Confidence addresses four such scenarios:
Compositions: Qualitys like allOf, not, or has are grouped under the Composite class.
Grammar Improvements: Qualitys that enhance grammar, such as is, to, and soIt, reside in the Grammar class.
Framework Adapters: Adapters to other frameworks, such as the Hamcrest adapter qualifiesAs, are found in the Adapter class.
Non-Java Types: Qualitys describing non-Java concepts may reside in a dedicated class, e.g. JSON qualities are housed in the Json class.
This organization ensures that regardless of the type or scenario you’re testing, Confidence provides a structured and intuitive approach to discovering and utilizing its Qualitys.
Testing Qualities
Classic non-declarative tests often times have a major flaw: the (often times very imperative) test code is not tested itself. After all, you only can trust your production code, when you can trust the test code too.
The functional ideas Confidence is built upon, makes it easy to test
Qualitys and ensure the how has full test coverage.
Confidence makes it easy to test a Quality. Just describe the expected behavior when you provide instances that are expected to pass and some that are expected to fail the assertion of the Quality under test:
assertThat(newEmptyCharSequence(), // The Quality under test.newAllOf<>(
newPasses<>(""), // An example that should pass the test.newFails<>(" ", "\"\""), // Examples that should fail the test …newFails<>("123", "\"123\""), // … along with the resulting description.newHasDescription("<empty>") // The description of the Quality.
));
}
Switching from Hamcrest
As a Hamcrest user you’ll find it easy to switch to Confidence. The core idea is the same: Composable components to describe he expected behavior of your code. In Hamcrest these are called Matcher, in Confidence they are called Quality.
There are some significant differences though:
In case of a mismatch, Hamcrest (for Java) needs to run the Matcher again to get a mismatch description, a Confidence Quality returns an Assessment that contains the result and a description of the issue (in case the assessment failed).
Confidence makes it easier to produce comprehensible descriptions, closer to what Assertj or Google Truth produce, by using composable Descriptions
In Confidence the ContainsQuality has the same semantics as Java Collection.contains(Object)
Confidence has out ouf the box support for testing Quality implementations.
There are also some noticeable differences in how some of the core Quality implementations are being
called or used. The following table shows the most important ones.
General note on matching arrays: arrays (including ones of primitive types) can be matched with matchers to match Iterables decorated with arrayThat(…).
Hamcrest
Confidence
contains(...)
iterates(...)
containsInAnyOrder(...)
iteratesInAnyOrder(...)
iterableWithSize(...)
hasNumberOfElements(...)
hasItem(...)
contains(...)
hasItems(...)
containsAllOf(...)
everyItem(...)
eachElement(...)
sameInstance(...), theInstance(...)
sameAs(...)
matchesRegex(...), matchesPattern(...)
matchesPattern(...)
array(...)
arrayThat(iterates(...))*
hasItemInArray(...)
arrayThat(contains(...))*
arrayWithSize(...)
arrayThat(hasNumberOfElements(...))*
*works with arrays of primitive types
confidence-hamcrest
Confidence provides adapters to use Hamcrest Matchers in Confidence assertions and Confidence Qualitys where
Hamcrest Matchers are required (for instance when working with rest-assured, mockito or awaitlity).
You can use Hamcrest Matchers with Confidence by including the confidence-hamcrest artifact and adapting it with
the matches adapter Quality.
One of the goals of Confidence is to eliminate any imperative code from unit tests. Unfortunately, with Jupiter you still need to write at least one very imperative assertThat statement.
That’s why the confidence-incubator module contains an experimental JUnit TestEngine to remove this limitation.
With the ConfidenceEngine you no longer write statements. Instead, you declare Assertions that are verified when the test runs.
Check out the HasPatchTest from the dmfs/semver project. It verifies that the HasPatchQuality is satisfied by certain Versions (at present the naming has diverged a bit).
The class is annotated with @Confidence to make it discoverable by the ConfidenceEngine.
There are no statements in that test, not even test methods.
The test only declares certain Assertions that are verified by the test engine.
Also, there are no Before or After hooks. The idea is to make those part of the Assertion using composition. For instance, when a test requires certain resources you’d apply the withResources decorator like in the following test, that requires a git repository in a temporary directory: